Difference between revisions of "Curator View"
Anote2Wiki (talk | contribs) (→View Relation in Range) |
Anote2Wiki (talk | contribs) (→Multi Relation View) |
||
| Line 247: | Line 247: | ||
====Multi Relation View==== | ====Multi Relation View==== | ||
| − | In Multi Relation View it | + | In a Multi Relation View it is possible to: |
| − | * View | + | * View Relations Associated to a Text Range, Entity or Clue (Blue). |
* View Sentence Range text with Entities and clues (underlying) (In Violet) | * View Sentence Range text with Entities and clues (underlying) (In Violet) | ||
* [[Curator_View#Add_Relation_View| Add Relation]] (In Green) | * [[Curator_View#Add_Relation_View| Add Relation]] (In Green) | ||
| Line 257: | Line 257: | ||
[[File:RE_Multi_Relations_View.png|center|800px]] | [[File:RE_Multi_Relations_View.png|center|800px]] | ||
| − | |||
=== Add Relation/Event === | === Add Relation/Event === | ||
Revision as of 13:56, 23 January 2014
Contents
- 1 General View
- 2 Entity Management
- 3 Relations/Events Management
General View
To view the document, click on the annotated document's object previously added to the clipboard and a view will be opened. According to the process type (NER or RE Process) a specific GUI will be launched, showing only entities (Entity View) or a tabbed pane with both Entities and Relations/Events (Entity View and Relation/ Event View).
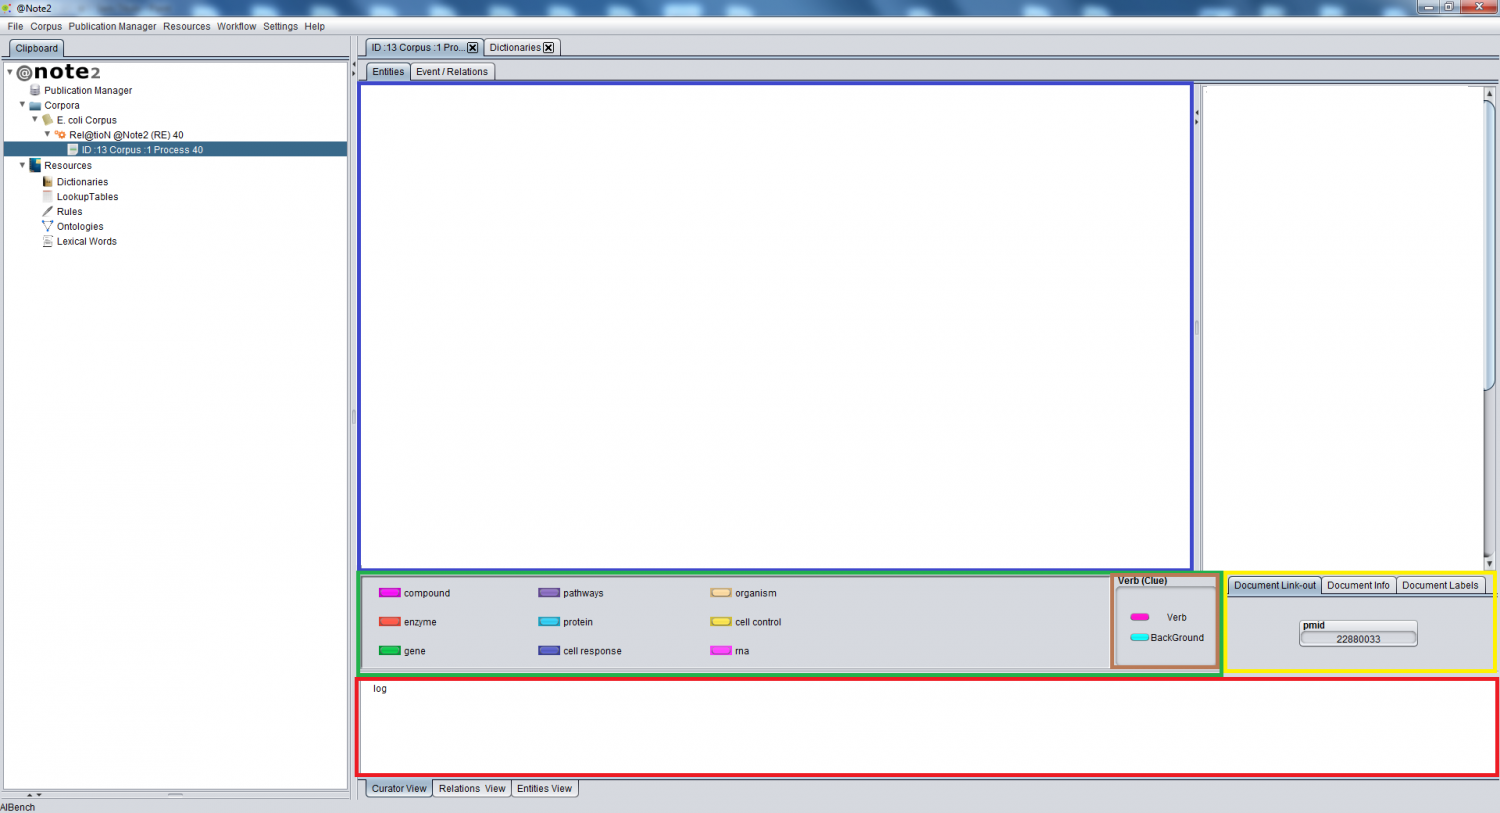
Both Tab Views are structured in the following sections:
- A central section with the annotated text (center, highlighted in blue).
- A section (bottom left, highlighted in green) to change the colors of class annotated entities and if available verb (Clue) and background color for relations/events (sub section in maroon);
- A Document Information section (bottom right, highlighted in yellow) to show document type, document link-out and document labeling.
- A Log section (footer, highlighted in red) with information about all manual curation steps performed (examples: entity added, entity class changed, relation/ event added, relation removed)
Entities View
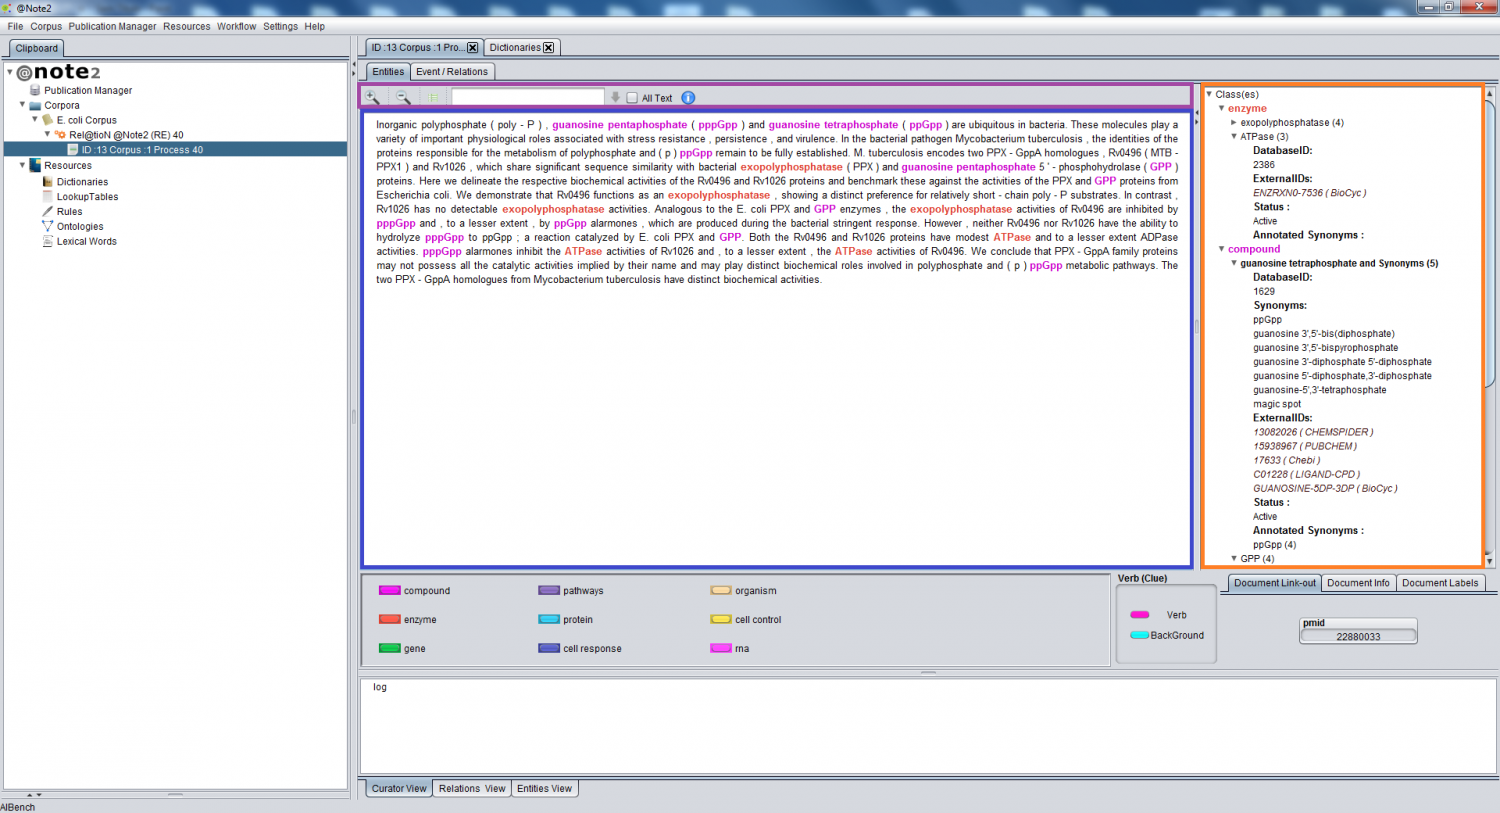
The Entity View is also structured in the following sections:
- A main section with text and entity annotations (center left, highlighted in blue)
- A section with buttons for zooming in and zooming out in the text and enabling lookup tables, a field to search text excerpts in the document and an All Text button (top left, highlighted in violet);
- A section with the annotated classes, and the terms annotated with each class (center right, highlighted in orange);
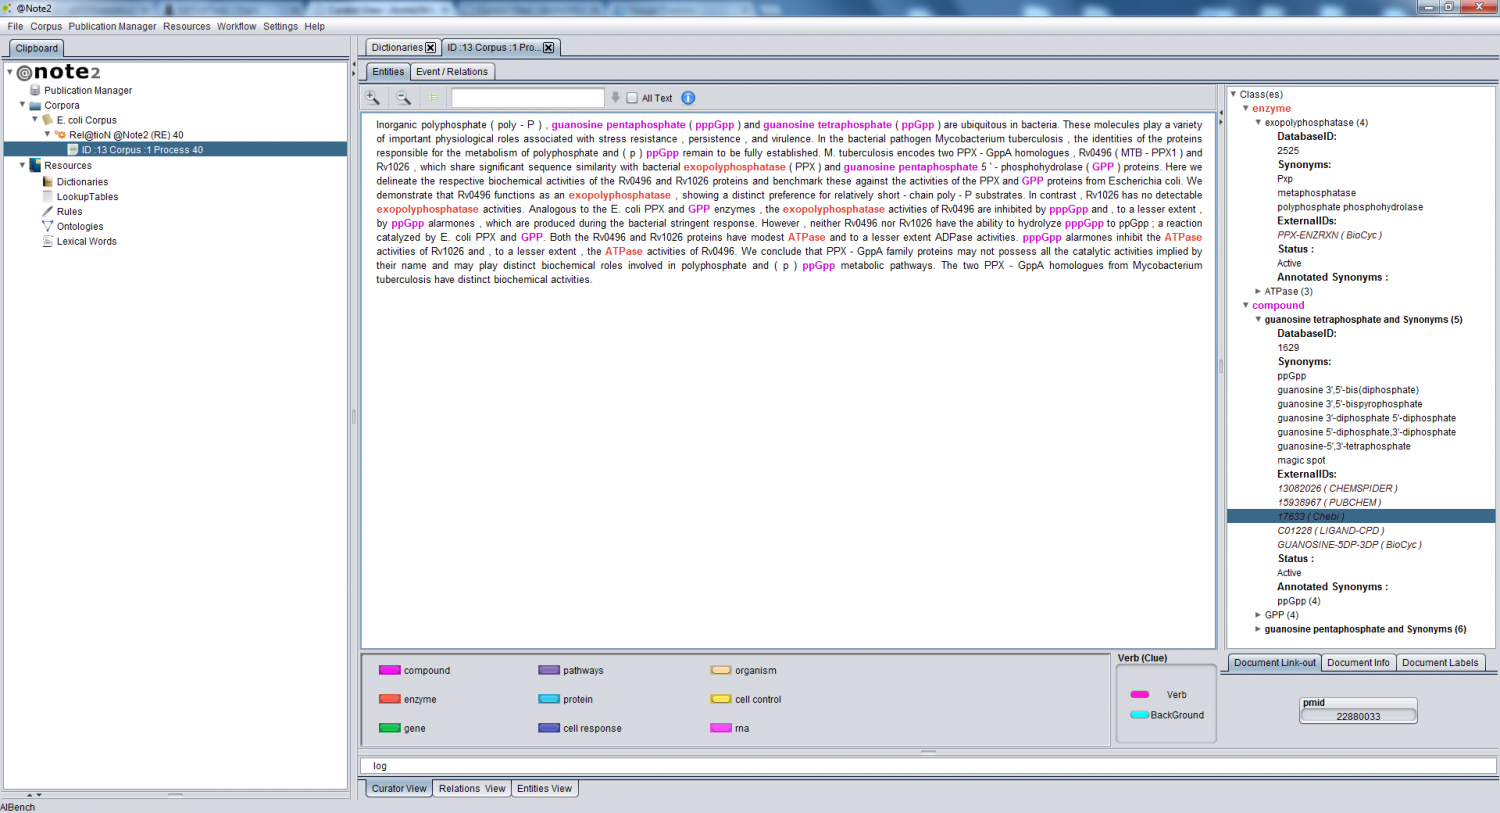
- Each term could have (deriving from resources) a Database ID , External Id's, Synonyms and Annotated Synonyms.
Options within the tab:
Entity Link-outs
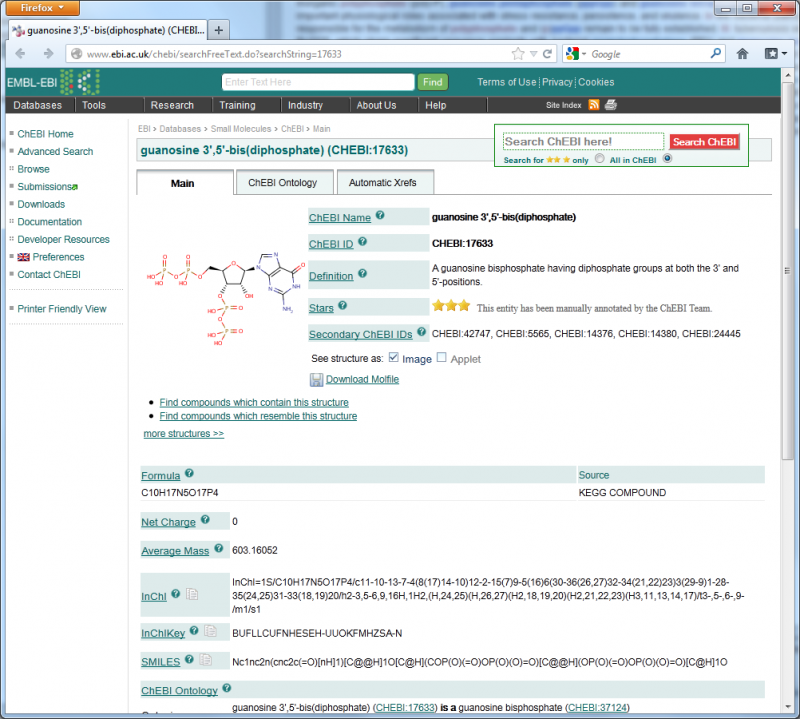
Within the Entities tab in the Curator view, you can search for additional information about text mentions (already annotated or not) in Web-accessible databases, accounting for unfamiliar terminology and confirming some classifications.
Text Annotation Link Outs
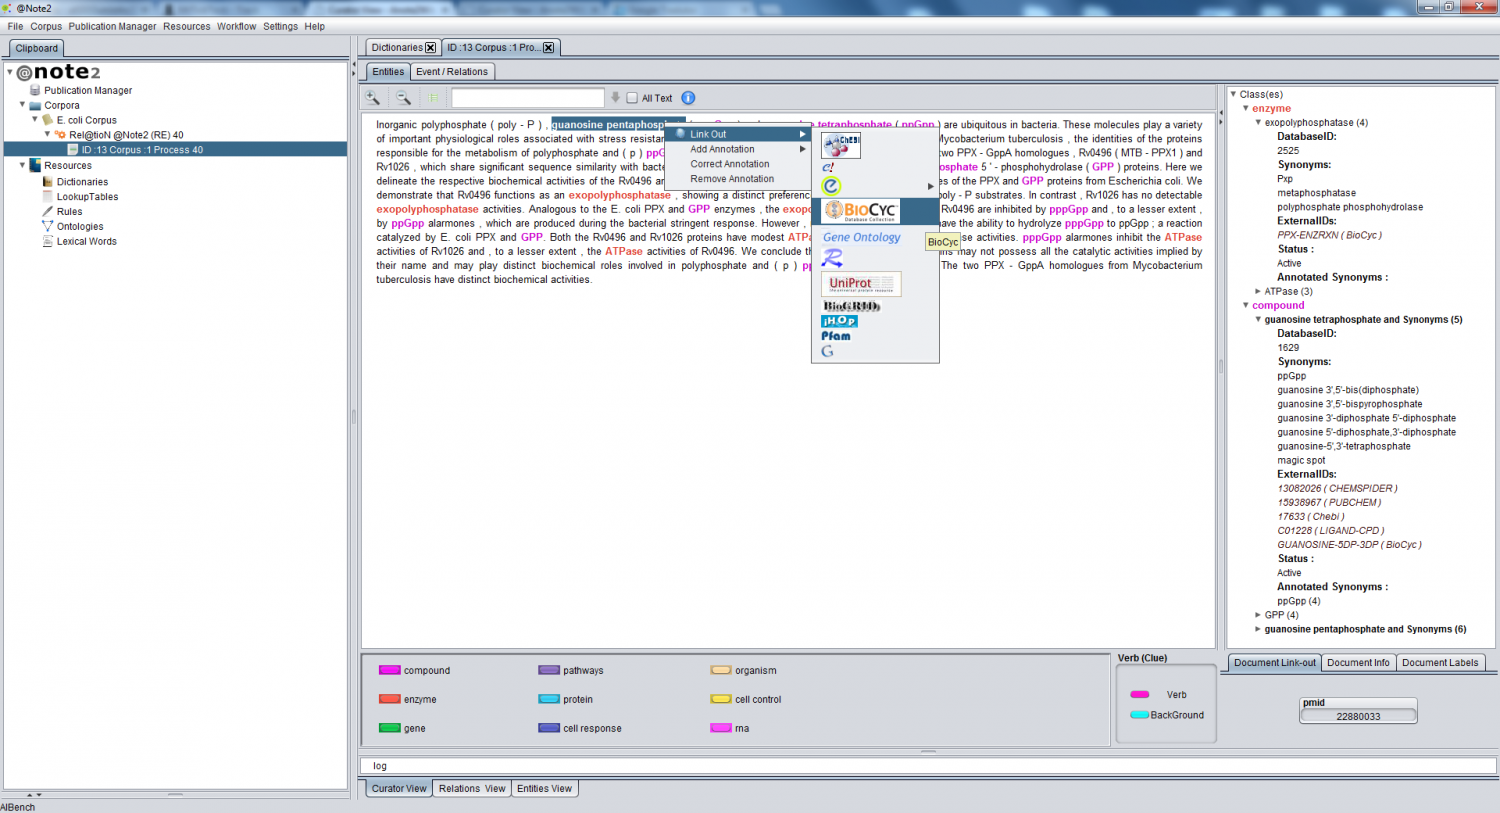
To access the external links, select a term in the text and choose the option External Links in the popup menu.
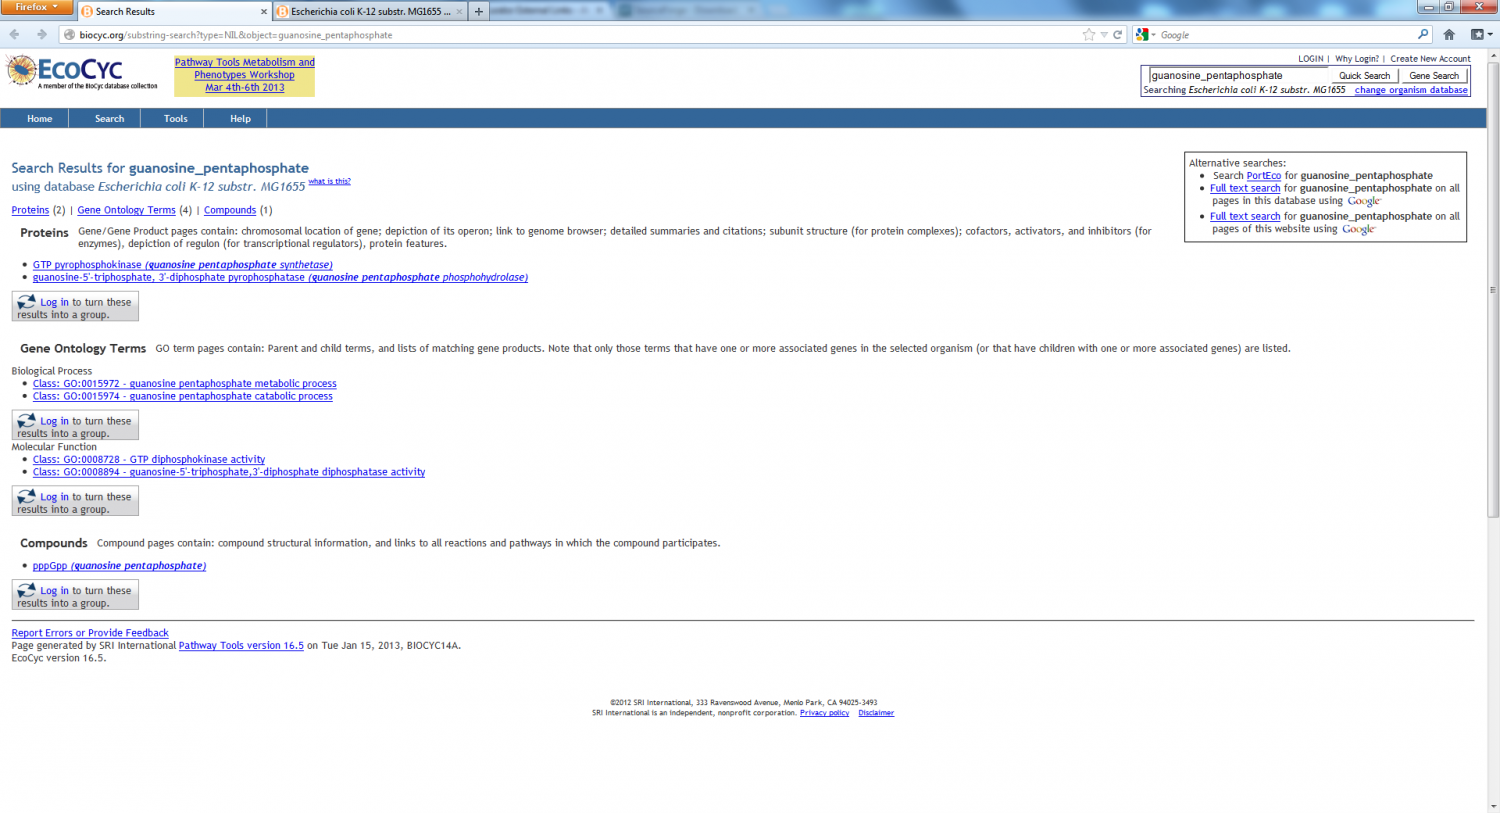
Then, a list with links to external databases appears and you should select the appropriate link to the term context. New tabs are opened in your browser with the respective URLs: one with the selected text and, if external IDs have been associated with the selected term, others directly pointing to External IDs associated to the term in eternal databases.
The External Links mentioned above can be edited in the GUI for managing external IDs and linkouts
Tree Entities Link Outs
In the tree with classes (right side panel in the Curator View), you can search the annotated entities divided by classes an grouped in a tree. Some annotated entities have information on DatabaseID, Synonyms, Annotated Synonyms ad External Ids. You can click in an External Id to open a direct link-out for the external source and respective record.
Relation/Event View
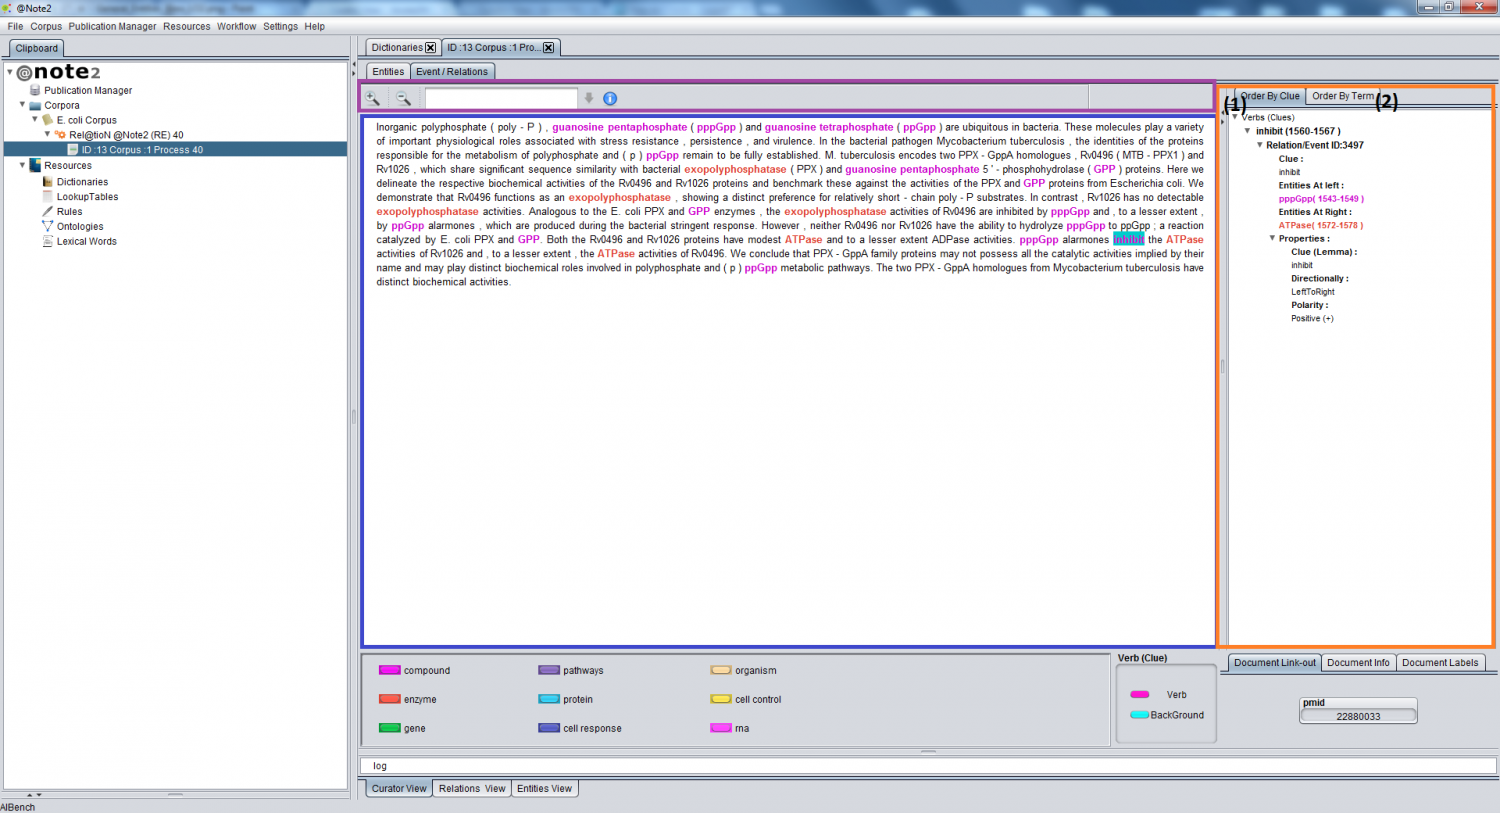
The Relation/event View tab is also structured in the following sections:
- A Main section (center, highlighted in Blue) with the annotated text.
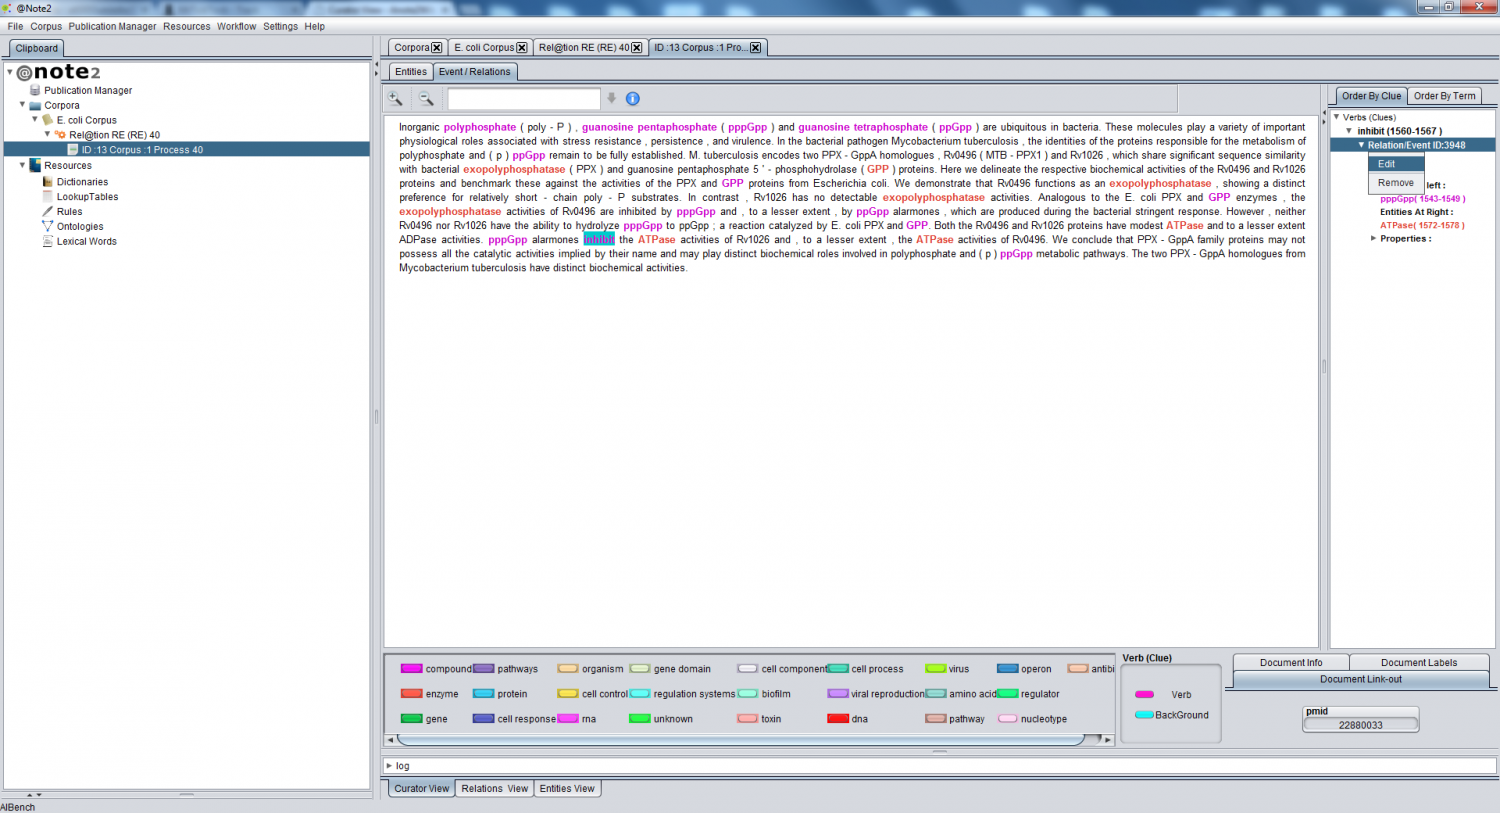
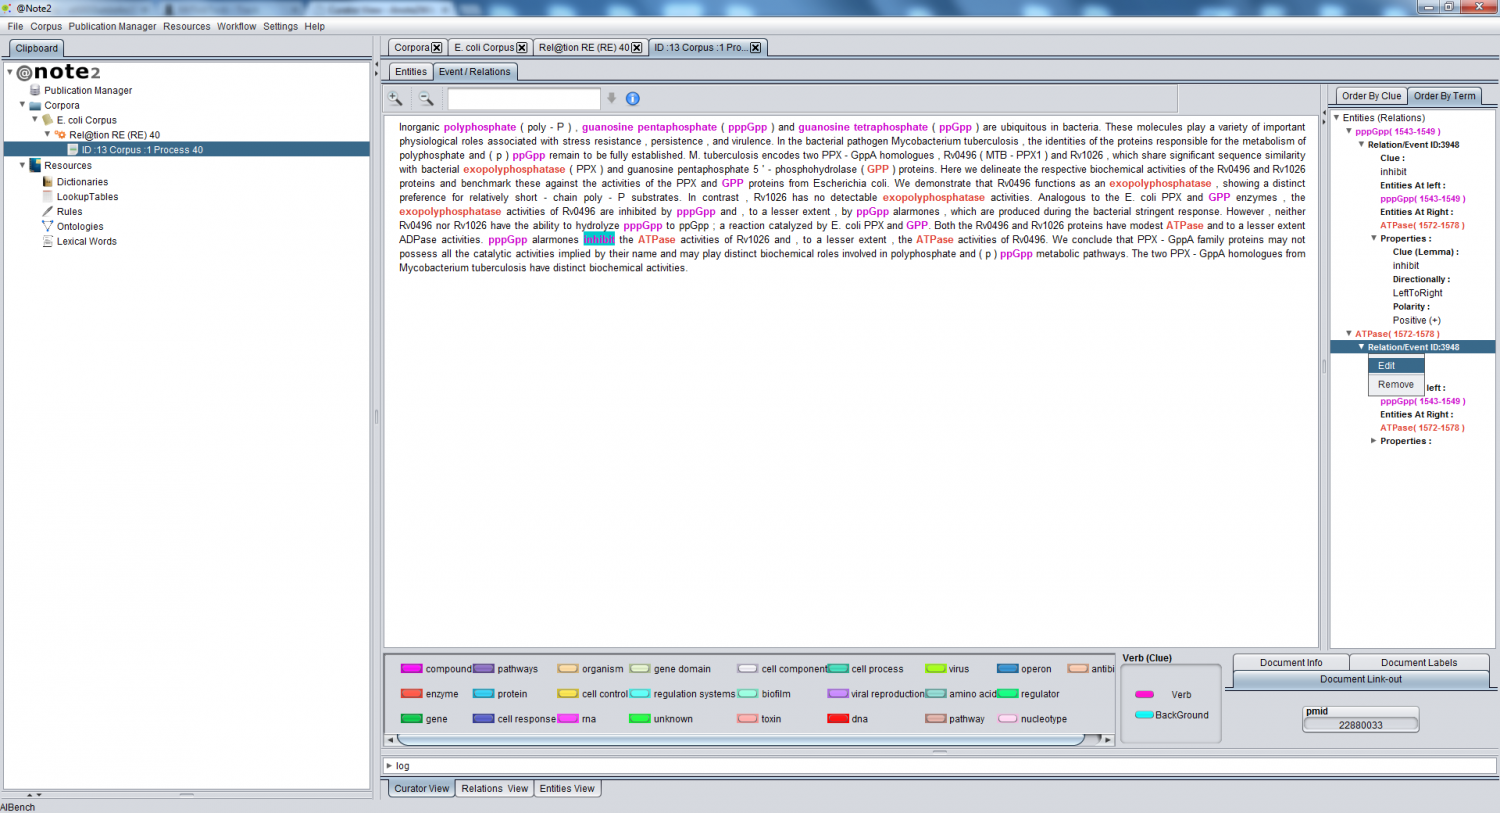
- A section with a tabbed pane with relation/event information (top right, highlighted in orange)
- Order By Clue Tab: information about relations associated with a clue, ordered by text appearance (1);
- Order By Term Tab: information about entities associated to Relations/ Events, ordered by text appearance (2).
- A section (top left, highlighted in violet) with buttons for zooming in and out over the text and a field to search text excerpts within the document;
Options within the tab:
Edit Relation/Event Annotation
Remove Relation/Event Annotation
Entity Management
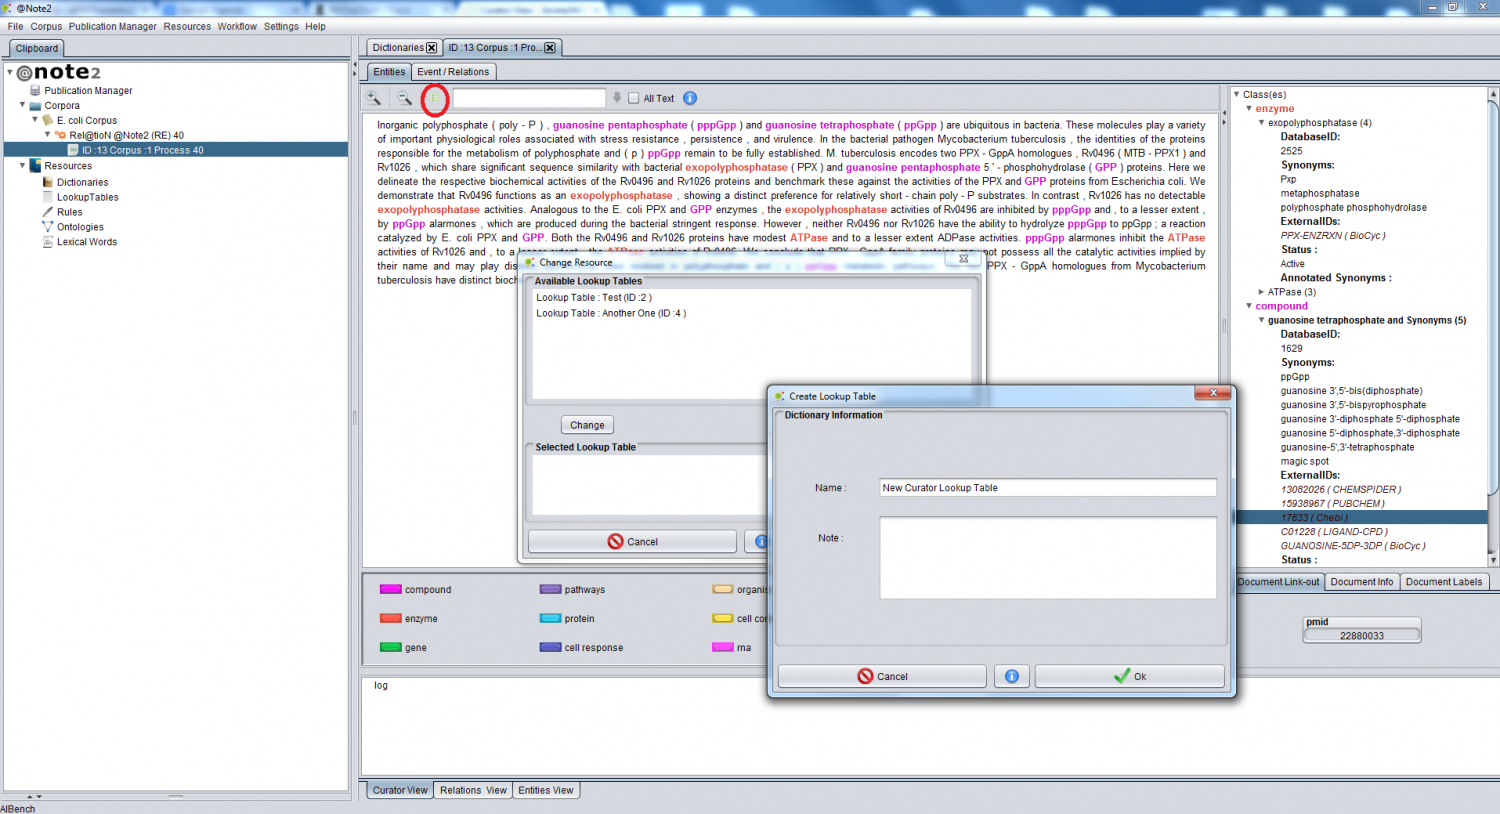
Use Lookup Table to save Entity Annotation Changes
Within the Curator view, you can enable a lookup table management of terms. When a lookup table is enabled (red circle) changes in the annotations are saved on the selected LookupTable and therefore can be used to annotate other documents in the future (using a Lookup Table resource to perform NER - see Corpus Create Annotation Schema By NER Lexical Resources).
After selecting the lookup table icon ( red circle ) a GUI is launched that allows selecting the lookup table or creating a new one.
If a lookup table is not selected the changes made in the curator are not saved, and therefore can not be used in future NER Processes being just used in the selected documents.
Add Entity
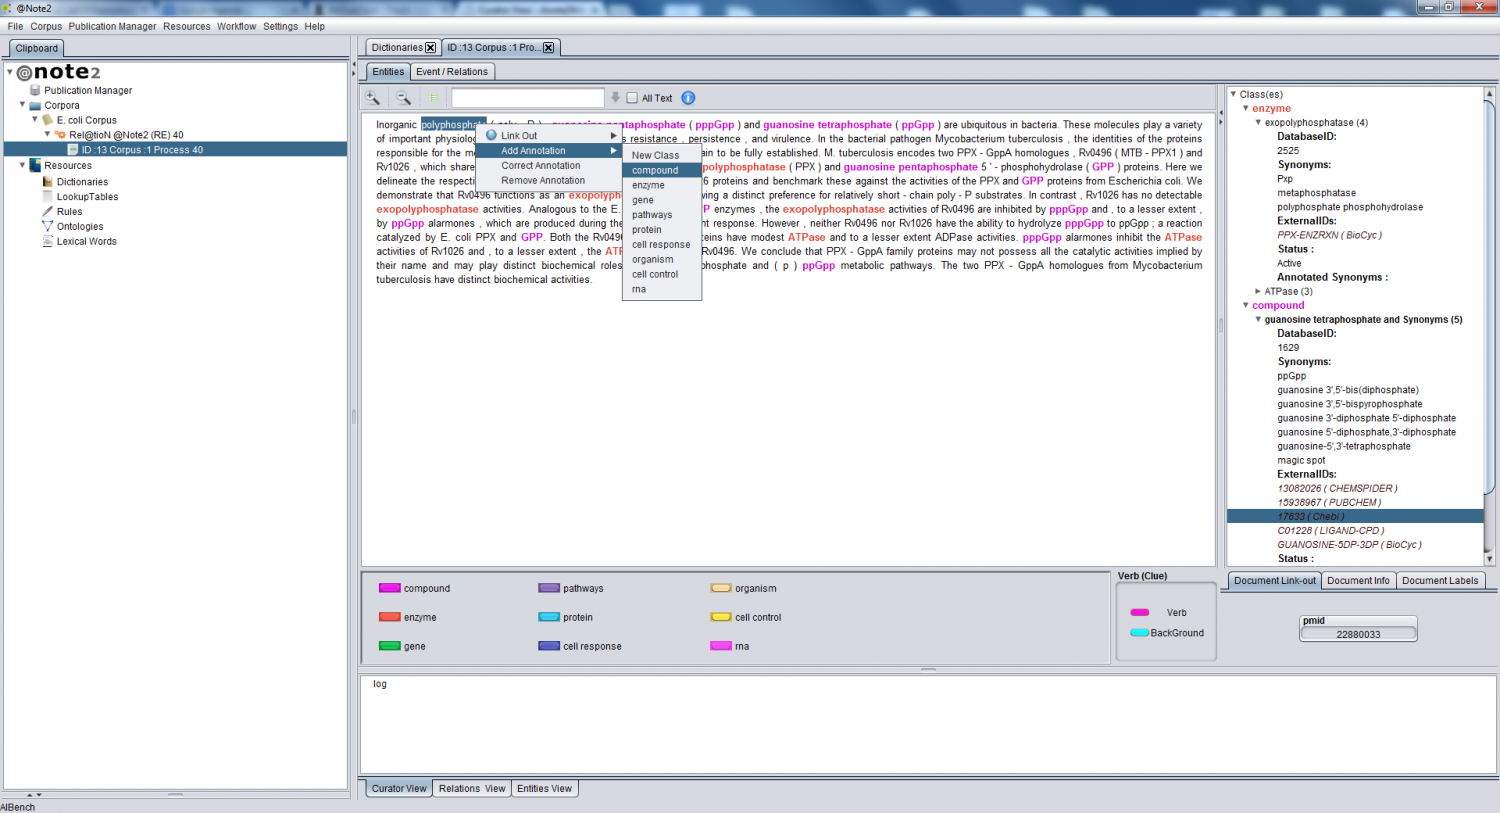
To annotate a new entity term, select the term and right click on it. A pop-up window will appear with the possible options, i.e. biological classes. The Add Annotation option must be chosen and the intended class selected. If the selected term is already annotated, it can't be annotated again.
You can annotate an entity with a new class selecting the option 'new class' . In this case, a window is launched to add a new class.
- Notes
- If a Lookup Table is enabled the changes are propagated to this lookup table. (The changes will be made in the underlying database supporting the lookup table and can therefore be used to annotate other documents in the future.)
- If the All Text option is selected, all annotations for instances of this term are added; otherwise just the selected annotation is added.
- Selecting All text option you can select case sensitive or not in case sensitive button.
Edit Entity
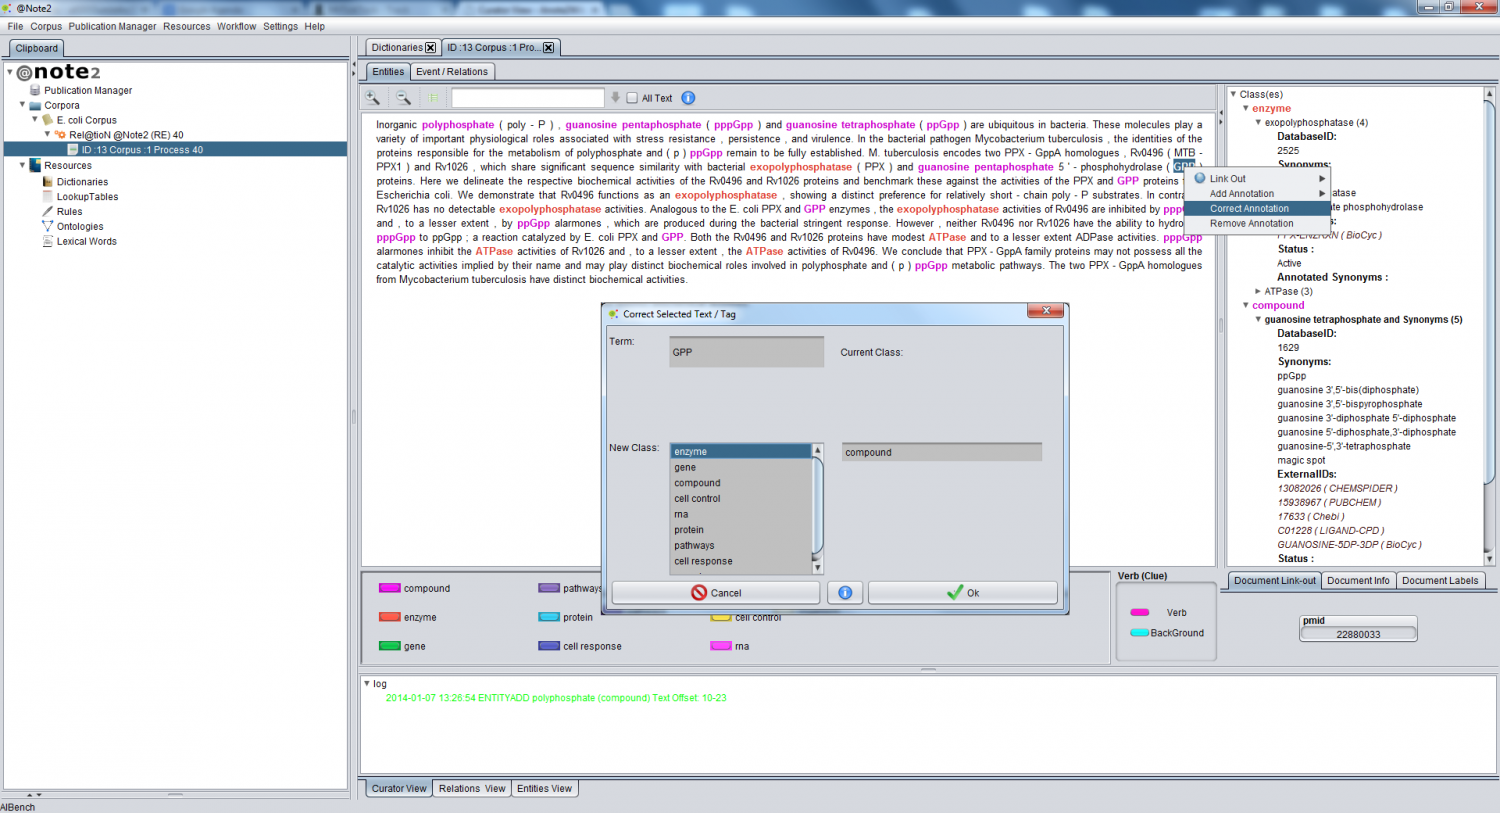
Within the Entity Tab , it is possible to correct an annotation. This correction can be done in the lexical form of the term or changing the class that the term is assigned to. To do so, select the term and choose the Correct Tag option in the popup window displayed. When this option is selected, a window appears where you can correct the annotation.
This window contains the term, the current class and the new class, initially identical to the initial, but including a list with all the classes that can be chosen for the new class.
To change the class of the term, just select one of the classes in the given list. If you want to correct the term, simply edit the term in the given text field. If not, just click the Apply button without editing the term.
When Apply is pressed, the changes will be made.
- Notes
- If a Lookup Table is enabled the changes are propagated to this lookup table.
- If the All Text option is selected, all annotations for instances of this term are changed to the new class; otherwise just the selected annotation is updated
Remove Entity
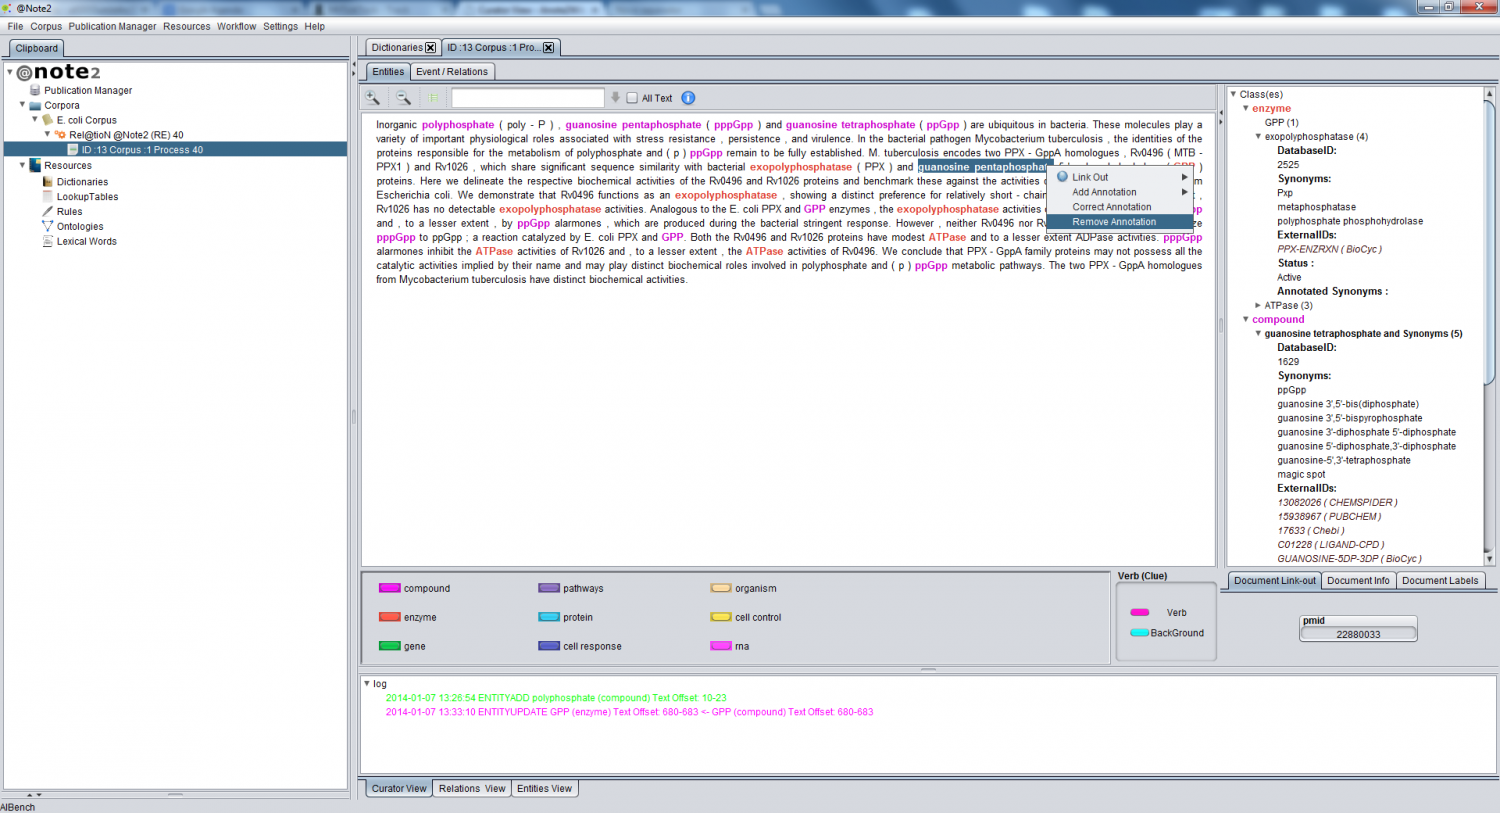
If a term annotation is known to be incorrect and the term should not be annotated with any of the possible classes, the annotation can be removed within the Curator view.
To remove an annotation, just select the term and choose the option Remove Tag from the pop-up window.
- Notes
- If a Lookup Table is enabled the changes are propagated to this lookup table.
- If the All Text option is selected, all identical annotations are removed from the text.
- If term(s) are present in relations, all relations associated with the removed term will be deleted!!!
Relations/Events Management
View Relations
Entities: View Relations associated to a term
To view relations associated to an annotated term the user must:
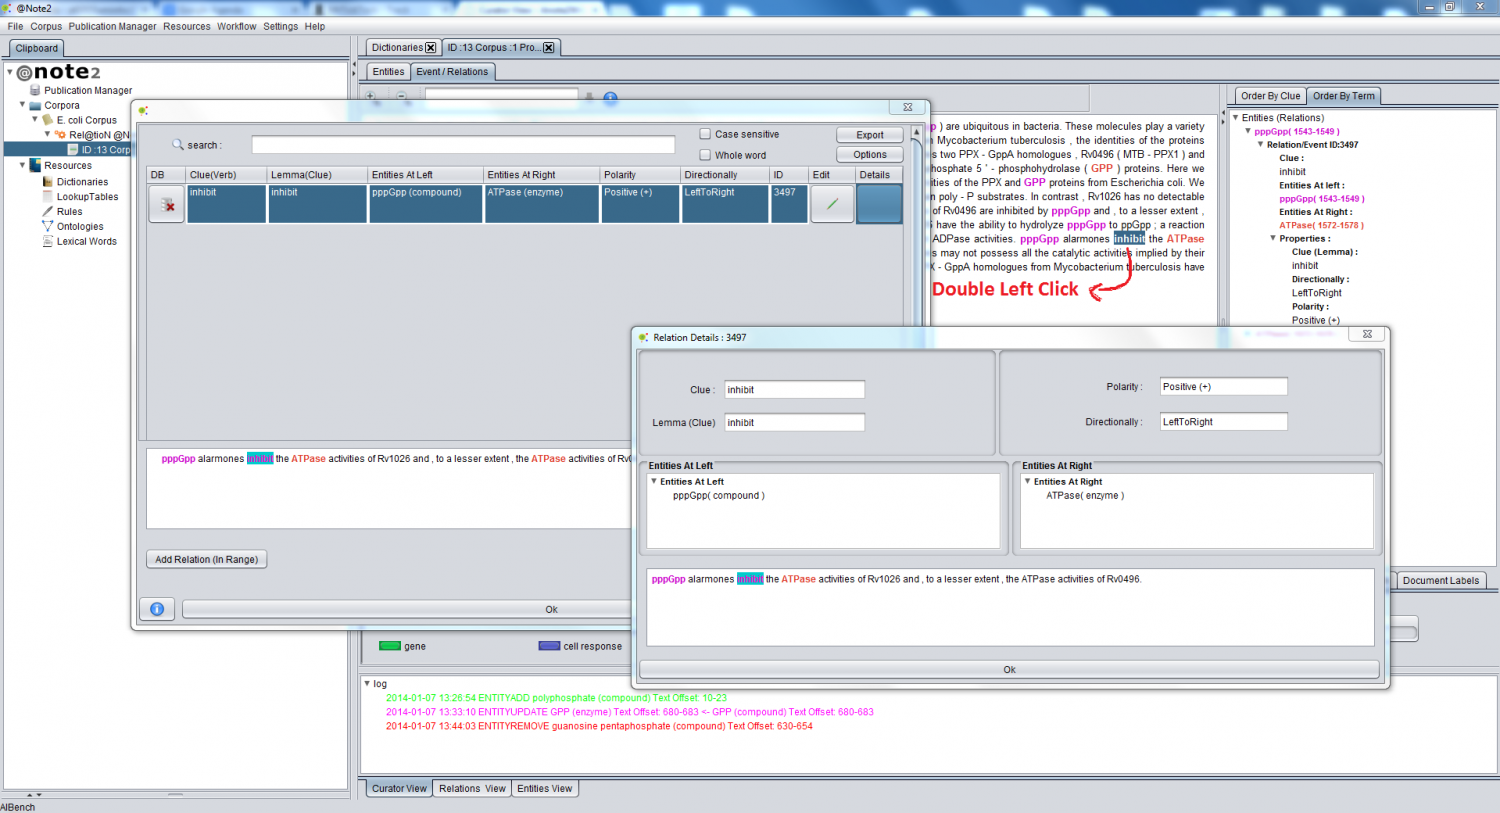
Double click in the entity annotation in the central panel.
After selecting the term, one of the following informations will appear:
- A message, if the entity does not have associated relations.
- A Multi Relation View with relations associated to selected Entity.
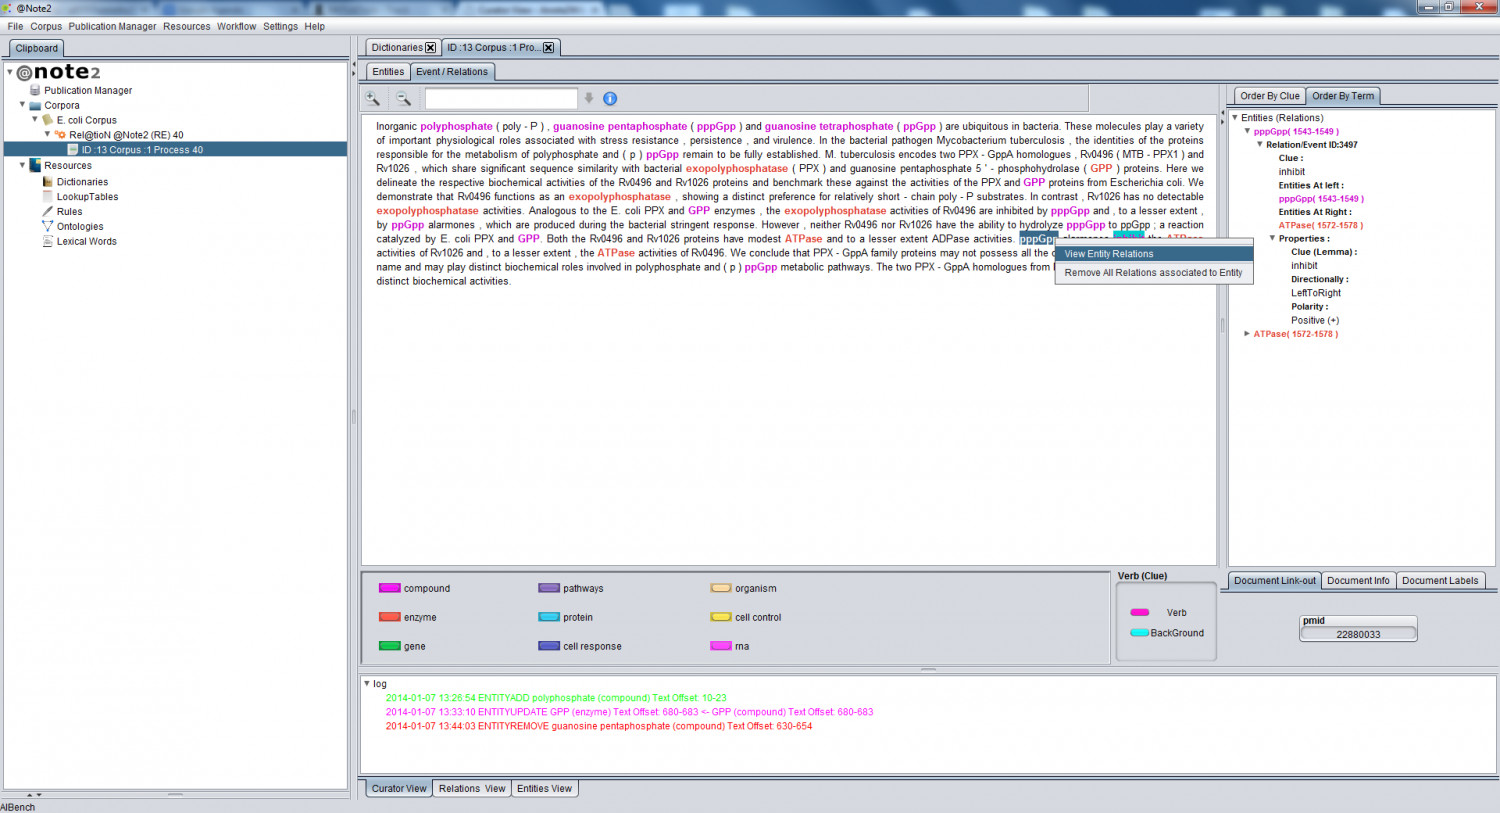
Right Click in the entity annotation in the central panel.
And, afterwards, select View Relation in the pop-up menu:
After selecting the term, a Multi Relation View showing the relations associated to the selected Entity appears.
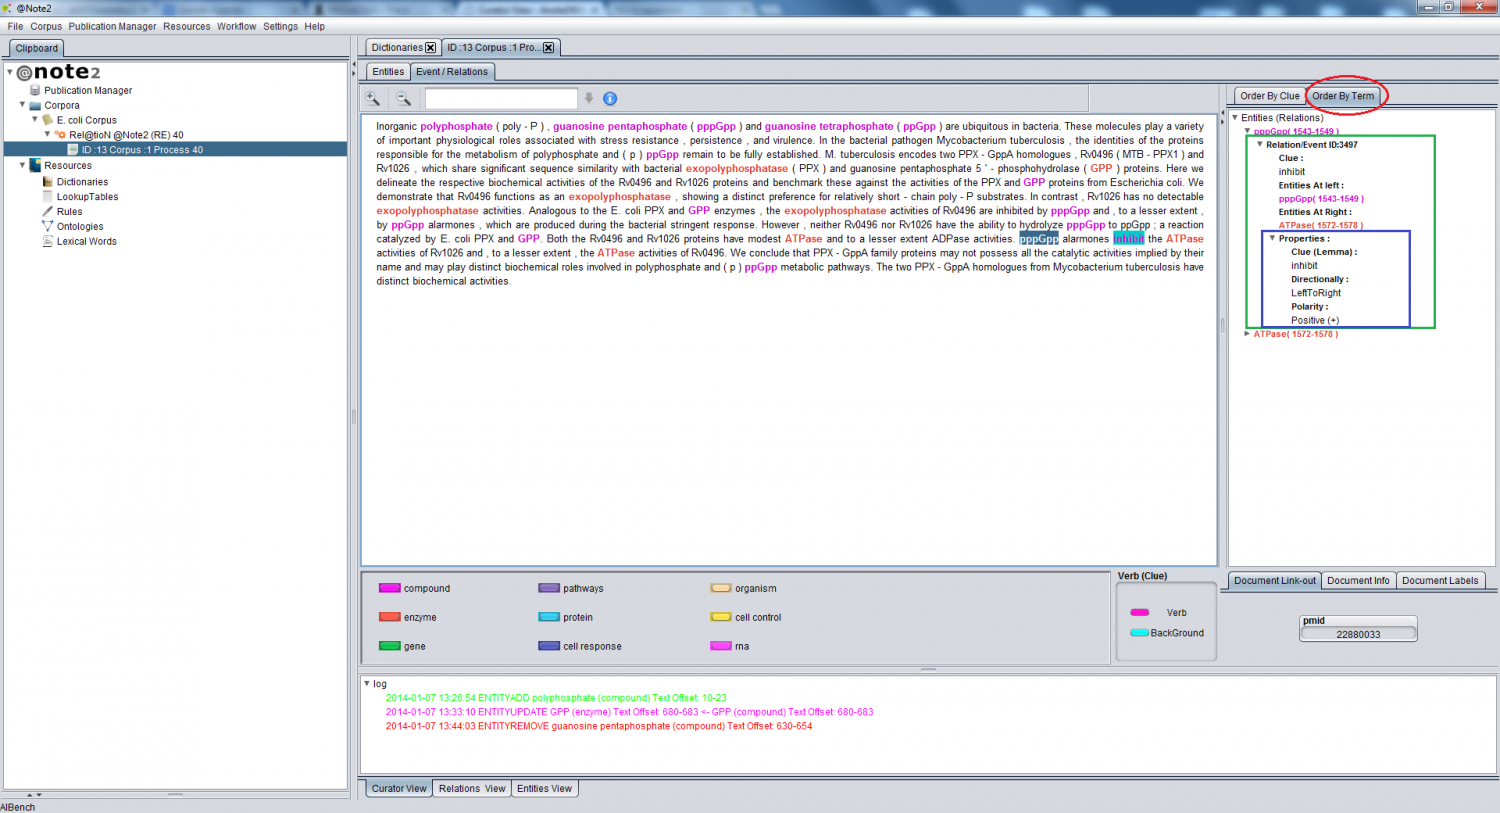
Using the Order By Term Tree (tab in the right) to find the appropriate entity and relation(s)
In the Green box, the general information about the relation is shown; in blue, the relation properties are identified.
Clue: View Relations associated to a clue (verb)
Double click in the clue (verb) in the central panel.
After selecting the clue(verb), open a Multi Relation View with the relations associated to the selected Clue.
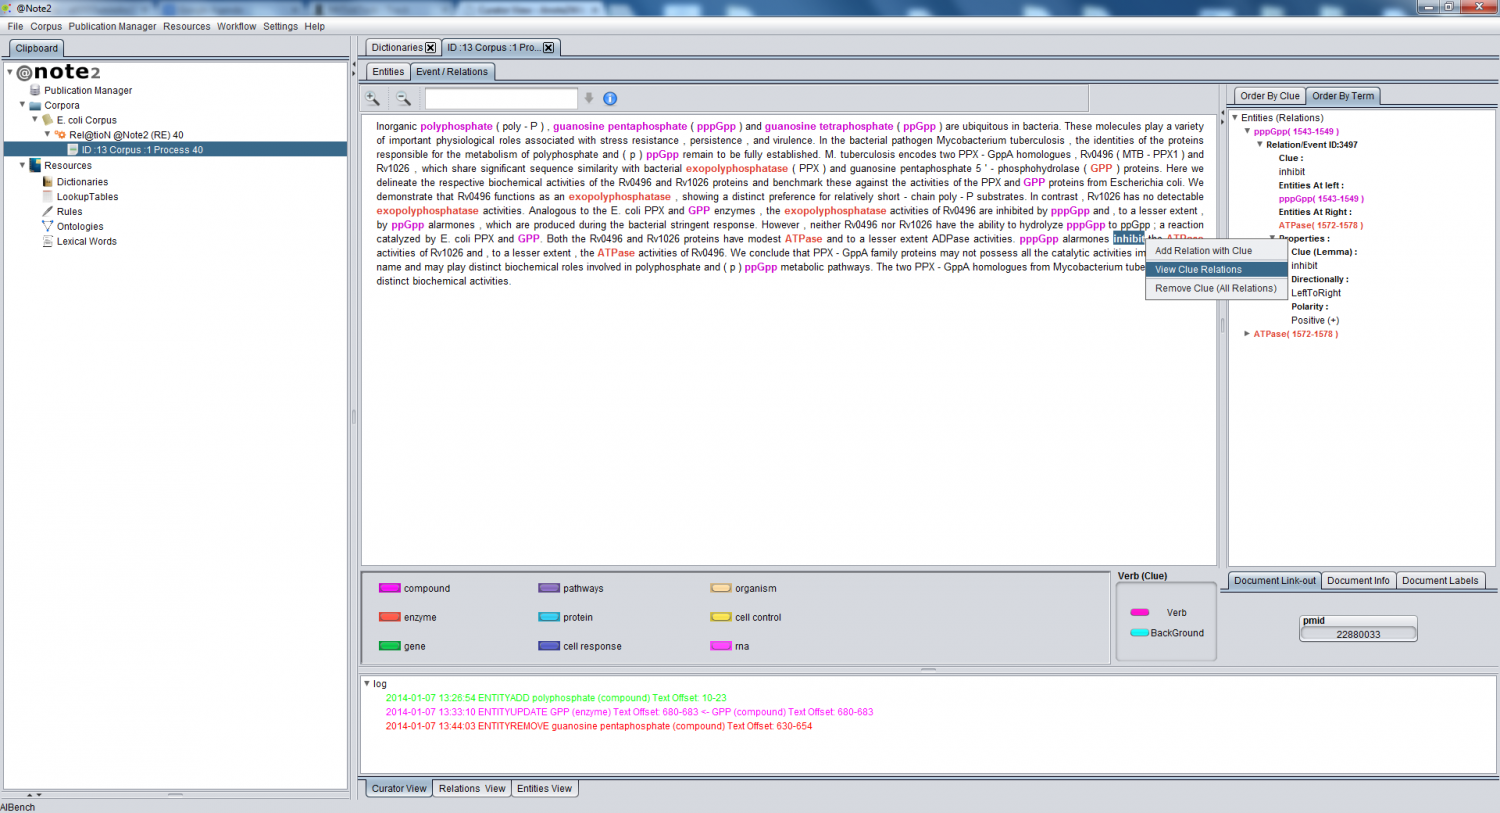
Right Click in the clue in the central panel.
And, afterwards, select View Clue Relation in the pop-up menu.
After selecting the term, a Multi Relation View with the relations associated to the selected clue appears.
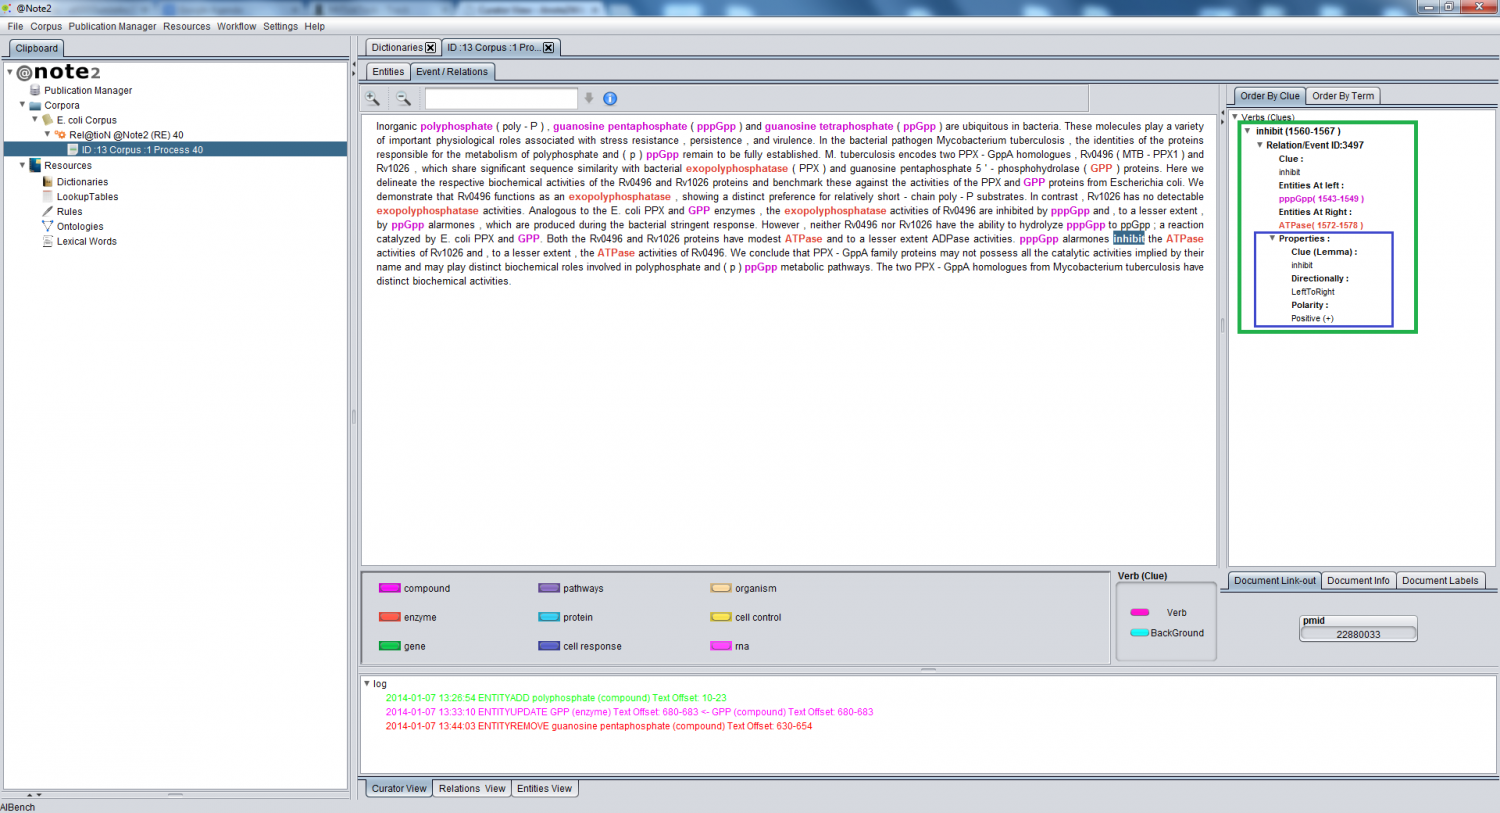
Using the Order By Clue Tree (tab in the right) to find appropriate Clue and relation(s)
To View the relations associated to a given clue (verb), search in the Order By Clue section for the appropriate clue (green box) and find its properties (box in blue).
View Relation in Range
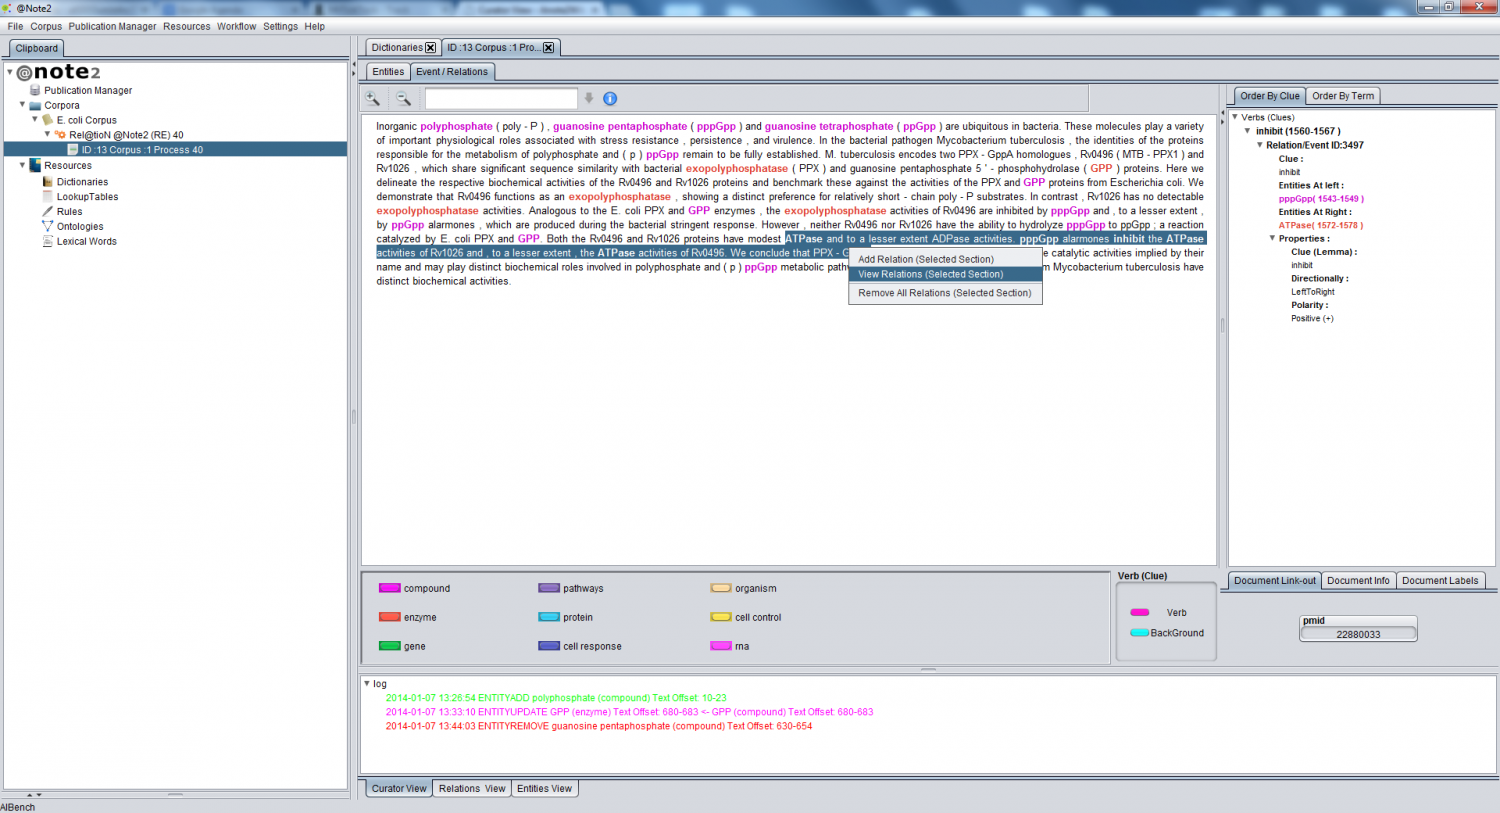
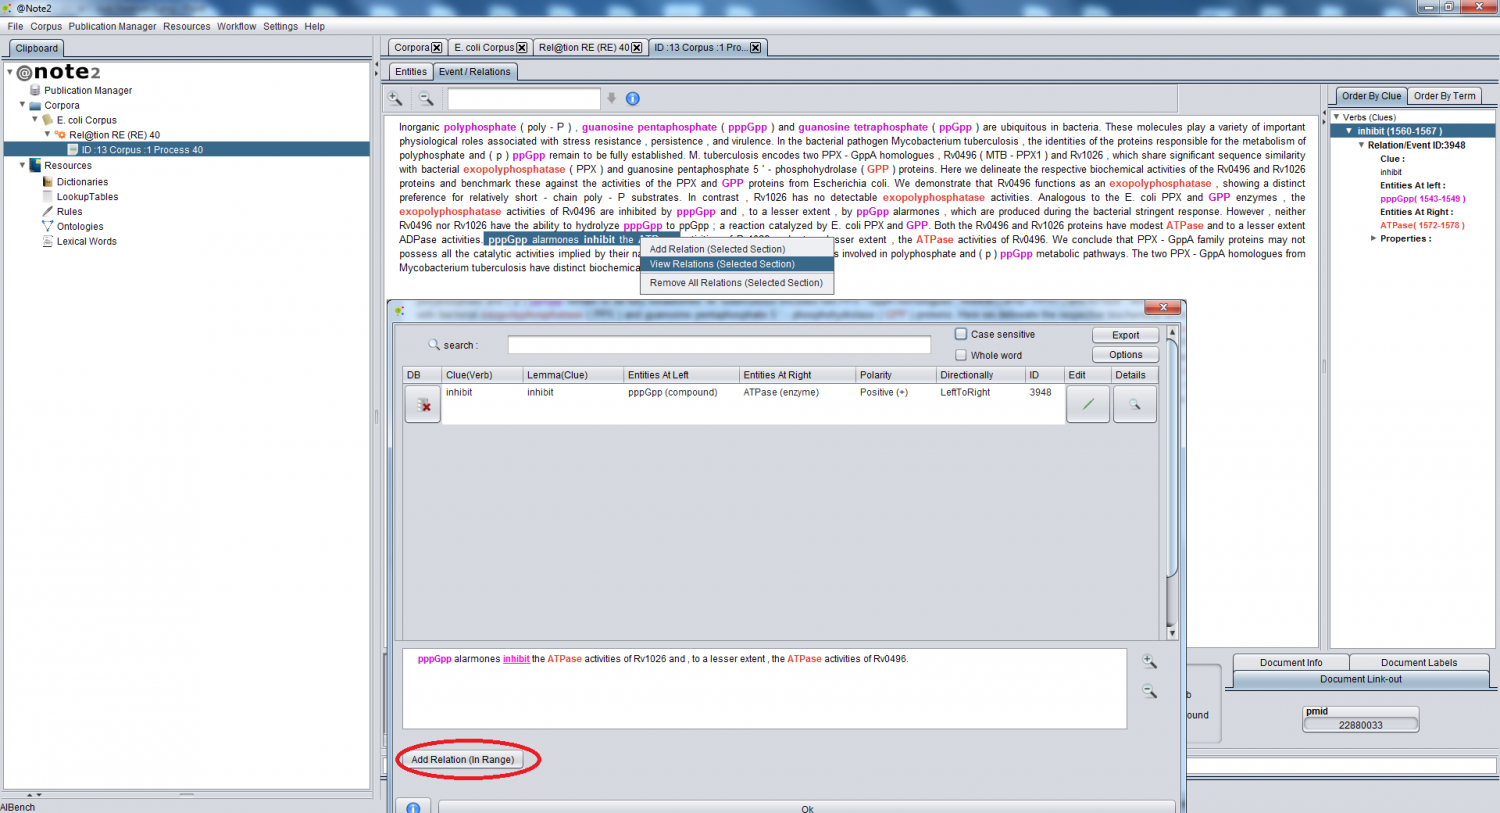
To view relations associated to a text range, select the desired text section, right click and select the option View Relation in the pop-up menu.
A Multi Relation View is shown with the relations associated to the selected text.
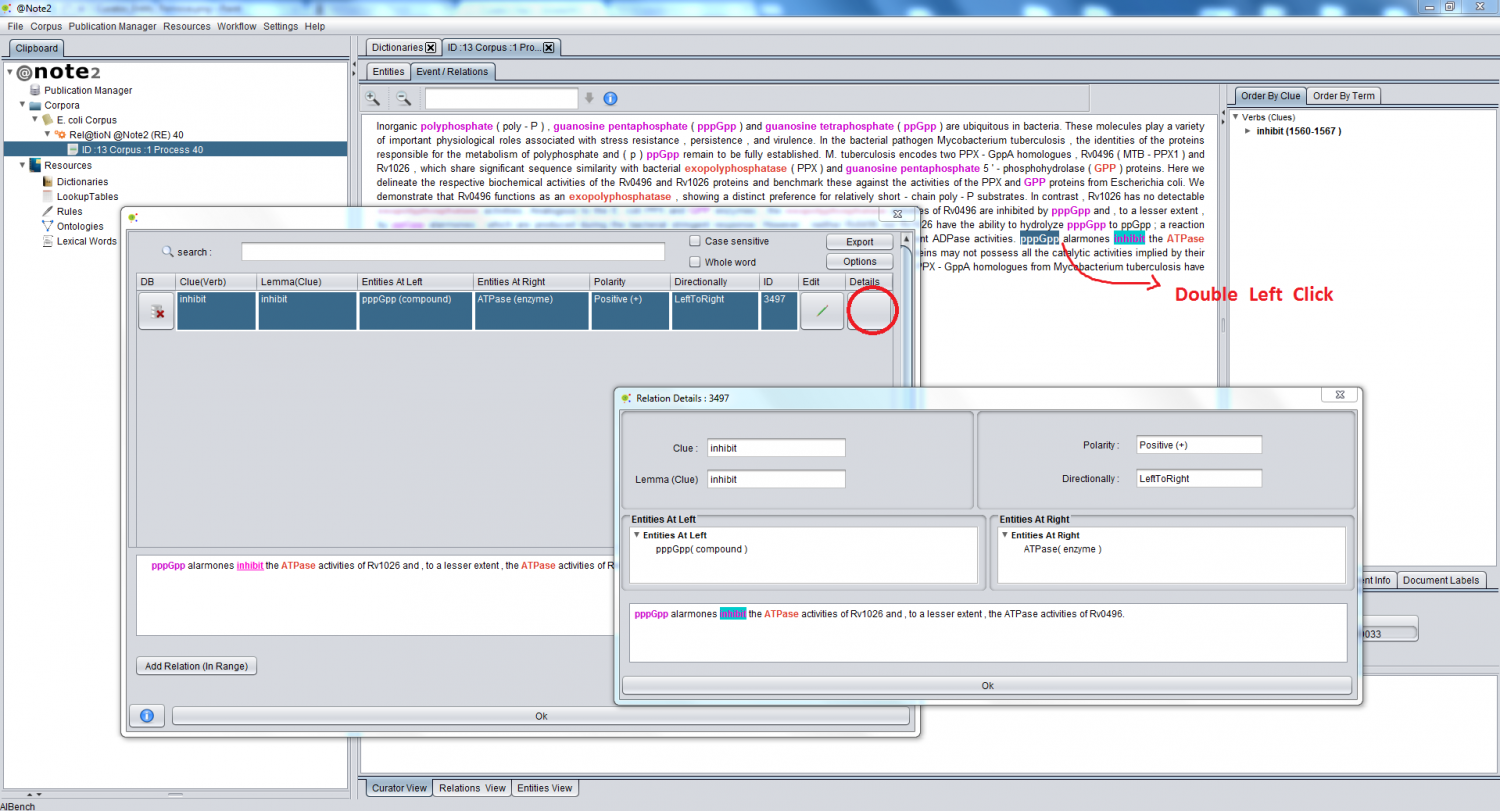
Multi Relation View
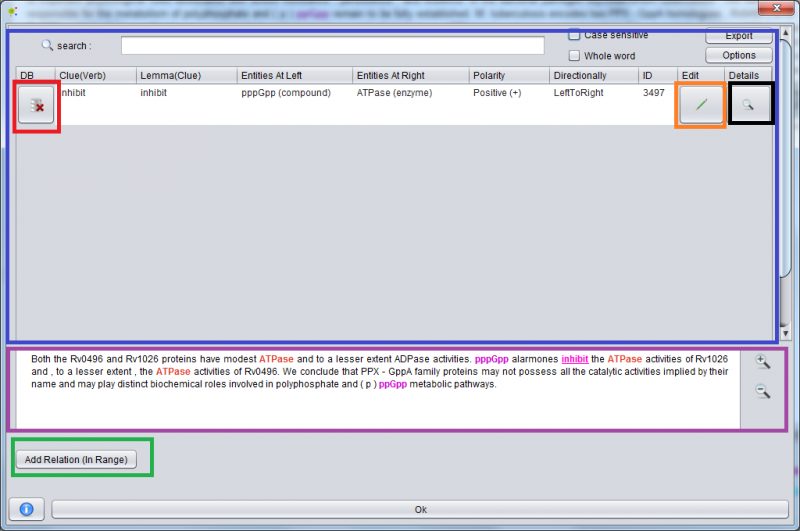
In a Multi Relation View it is possible to:
- View Relations Associated to a Text Range, Entity or Clue (Blue).
- View Sentence Range text with Entities and clues (underlying) (In Violet)
- Add Relation (In Green)
- Remove Relation (In Red)
- Edit Relation (In Orange)
- Relation Details (In Back)
Add Relation/Event
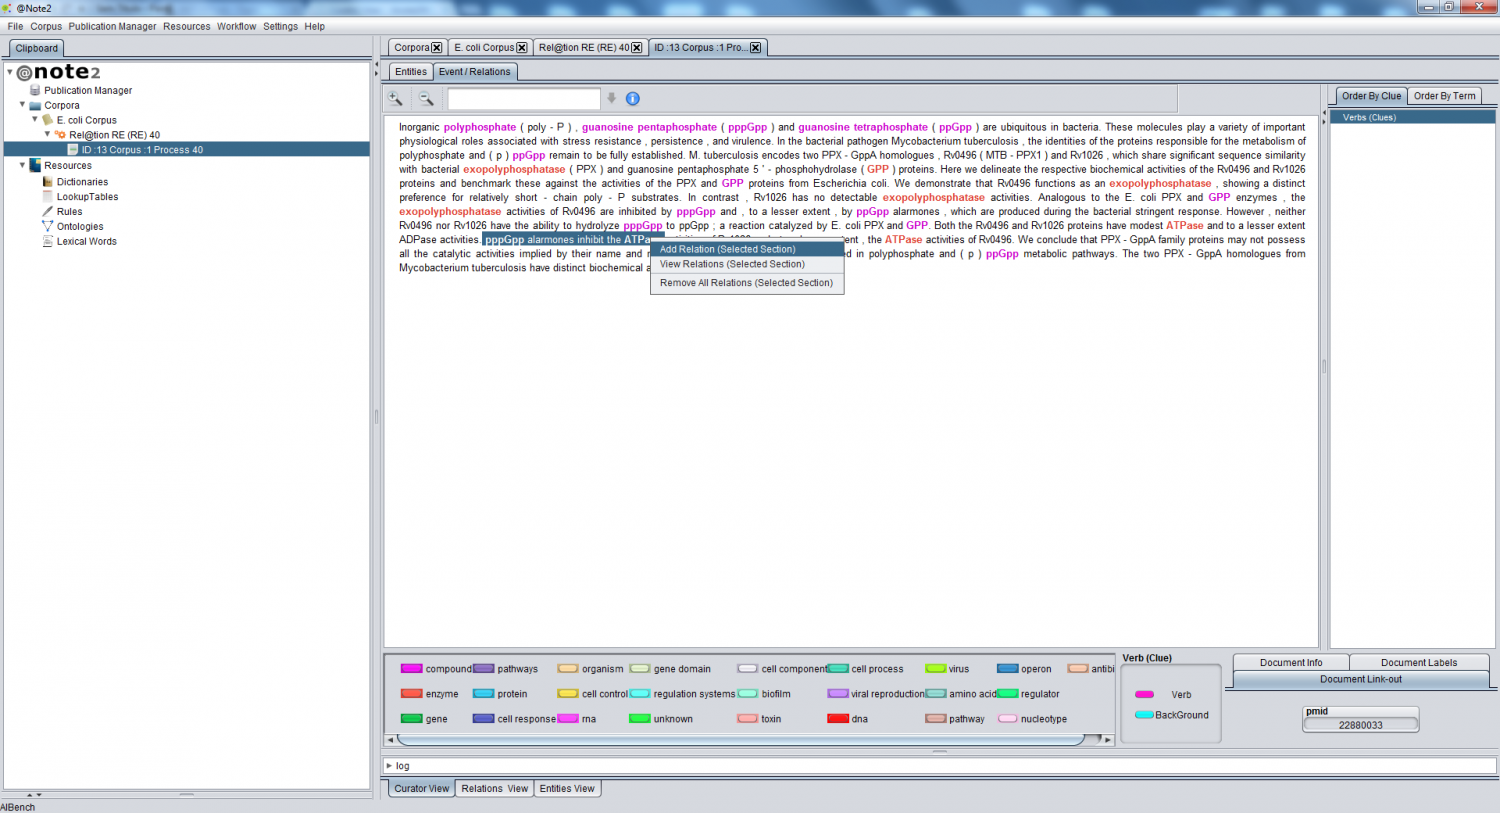
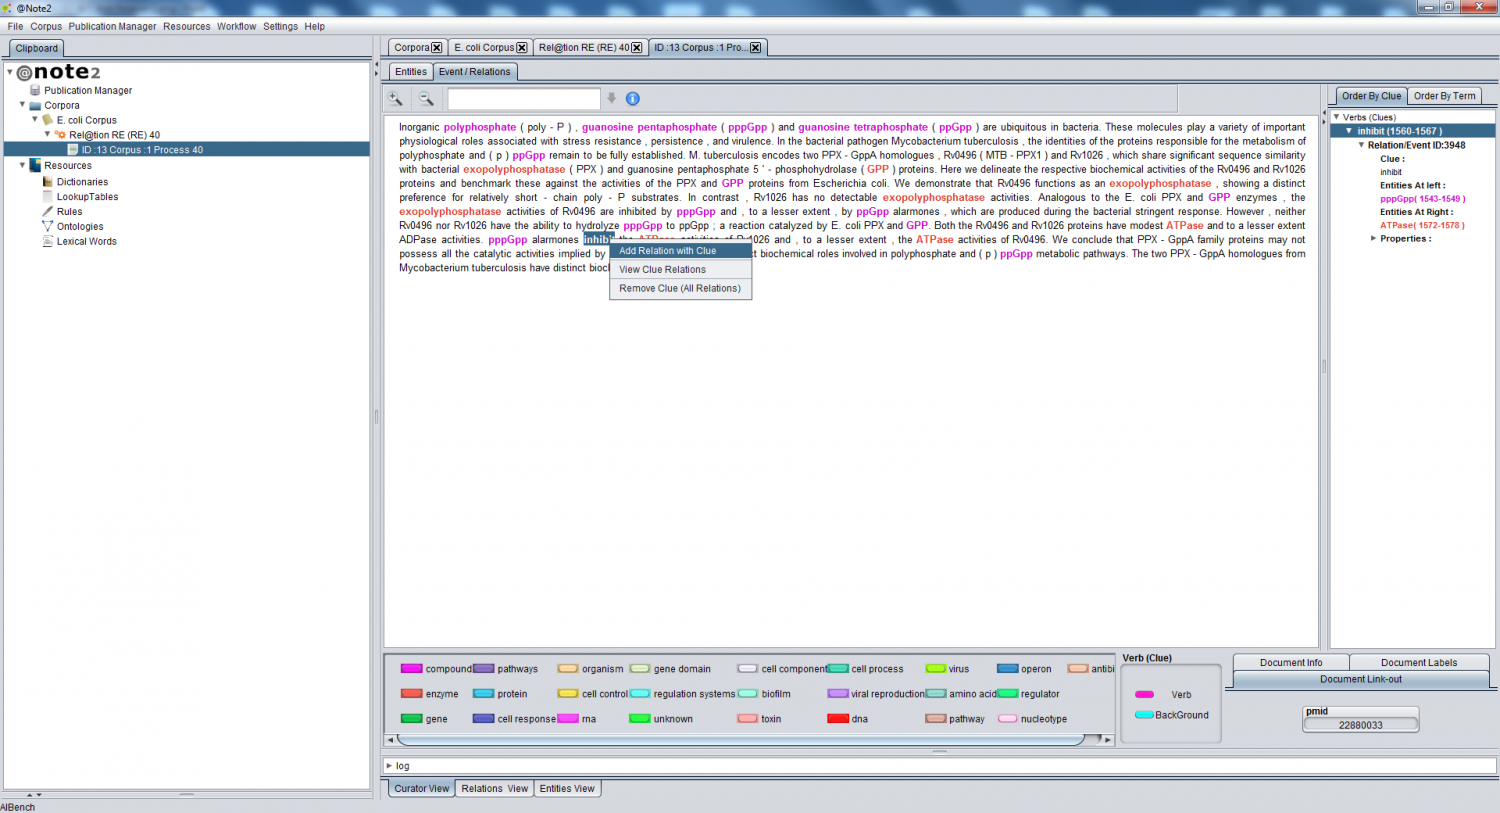
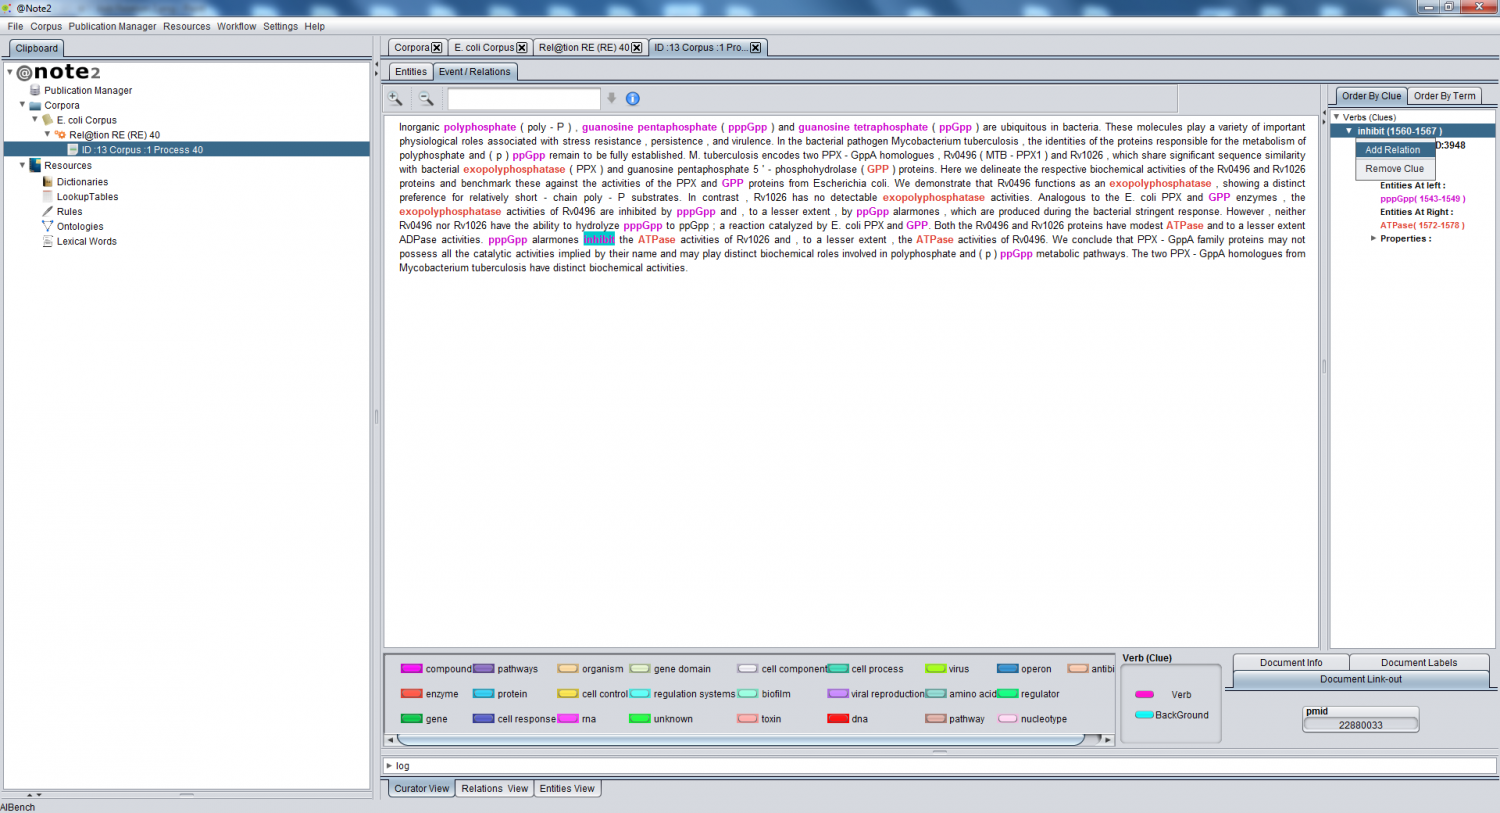
Exist some ways for user add a new relation/event Relation/Curator Tab:
- By selecting free text, right click and select add Relation on popup-menu
- By selecting a clue in text, right click and select Add Relation with Clue
- By right click in clue nodes in Order By Clue Tab in right panel.
- After Relation View user can add relation in selected range.
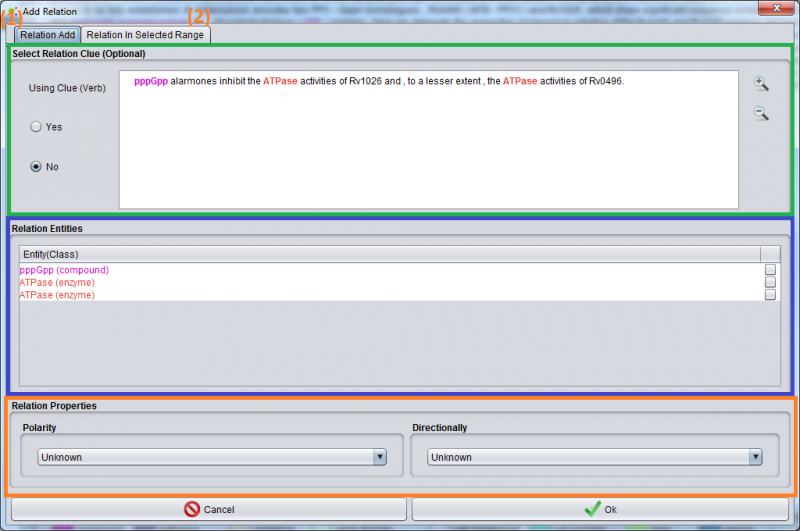
Selecting one of this options appears an Add Relation GUI for user configure new relation.
Add Relation View
The Relation Add GUI in two tabs;
- Relation Details (1) where user can define appropriated details for new relation
- Relation In Range (2) that contains a list of relation in range for consulting.
Relation Details Tab as divided in:
- Clue Section (in green)
- Entity section (in blue)
- Relation Properties (in red)
Clue Section
If relation does not have a clue ( define before), the user can define a relation:
1 - Without Verb (Clue) selecting Using Clue No button.
2 - With Verb (Clue) selecting Using Clue Yes button and select the clue in sentence by selecting a text corresponding to clue and right click and select select clue in popup-menu.
the clue will be highlighted
If Relation already has clue defined the clue will be highlighted and cannot be change also as Using Clue buttons cannot be selected.
Entity Section
In this subsection user can define entities for form a new relation. If relation have a clue selected appears two table one with entities at left and another one with entities at right
otherwise just appears one table with entities in range.
Important Notes: One relation without clue just have exactly two entities. One relation with clue have at least two entities.
Properties Section
In this section user can select Relation Properties.
- Polarity (Positive, Negative, Conditional r unknown)
- Directionally ( Left to Right, Right to Left, Both Sides or unknown)
Edit Relation/Event
Exist some ways for user edit an existent relation/event Relation Curator Tab:
- Selecting Relation Node in Order By Clue Tree, right click and select Edit Option in popup-menu;
- Selecting Relation Node in Order By Entity Tree, right click and select Edit Option in popup-menu;
- In Multi Relation View user can edit Relation
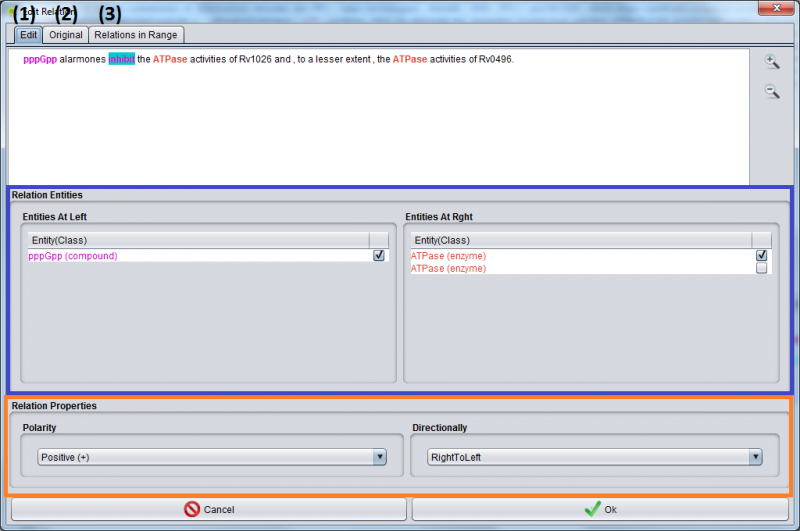
Selecting one of this options appears an Edit Relation GUI for user configure new relation.
Edit Relation View
Relation Edit GUI was divided in three tabs:
- Relation Edit Tab (1) where user can made relation changes
- Original Relation Tab (2) Where user can consult original relation
- Relation in Range Tab (3) where user can view relation in relation range.
Inside Relation Edit Tab user can change relation data:
- Relation Entities ( in Blue section)
- Relation Properties ( In Orange section)
Finishing edition user must press ok button.
Remove Relation/Event
Exist some ways for user remove a relation/event in Relation Curator Tab:
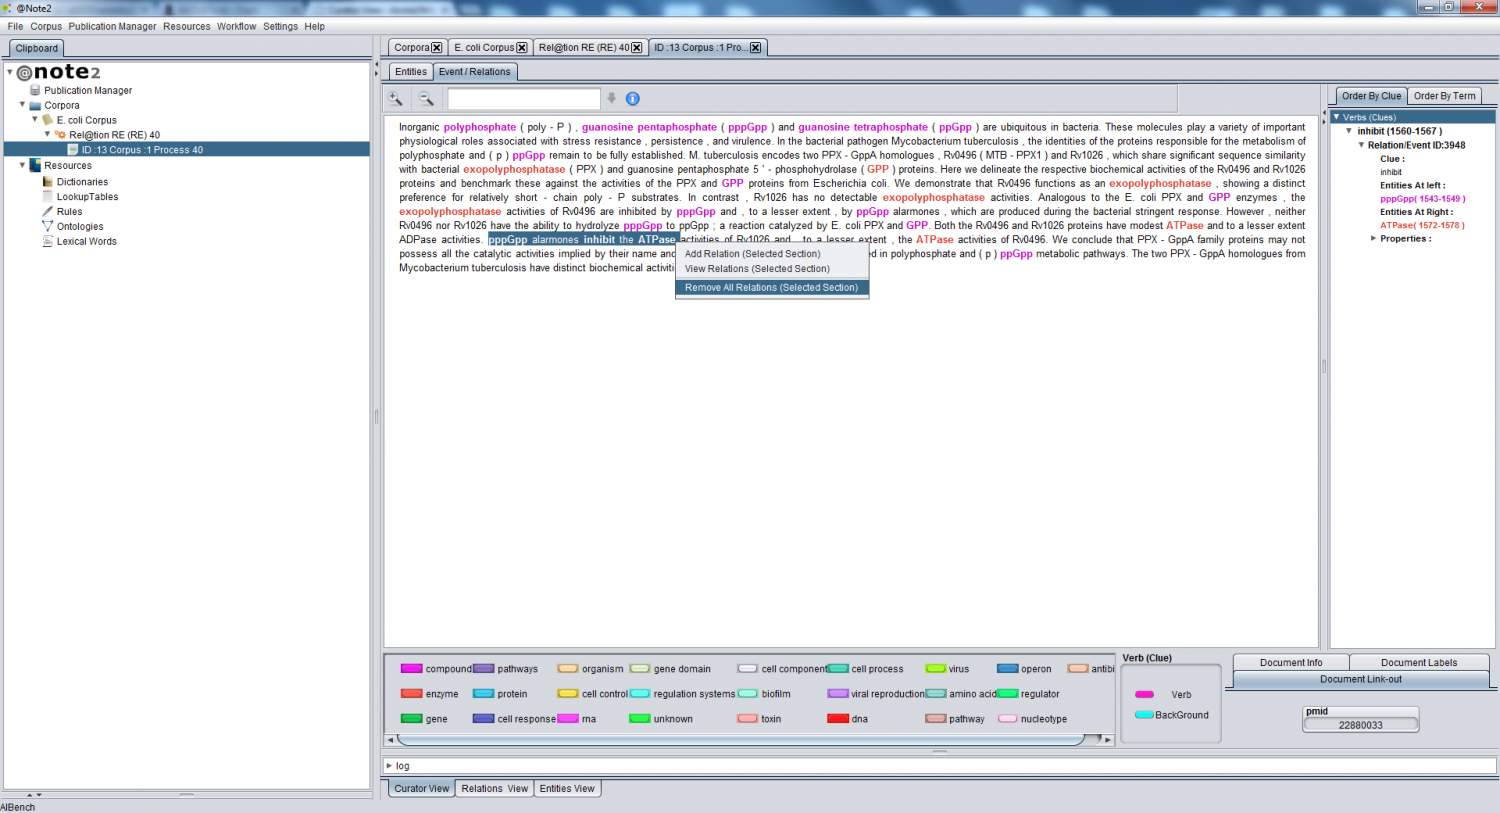
- By selecting free text range, right click and select add Remove all relations in range
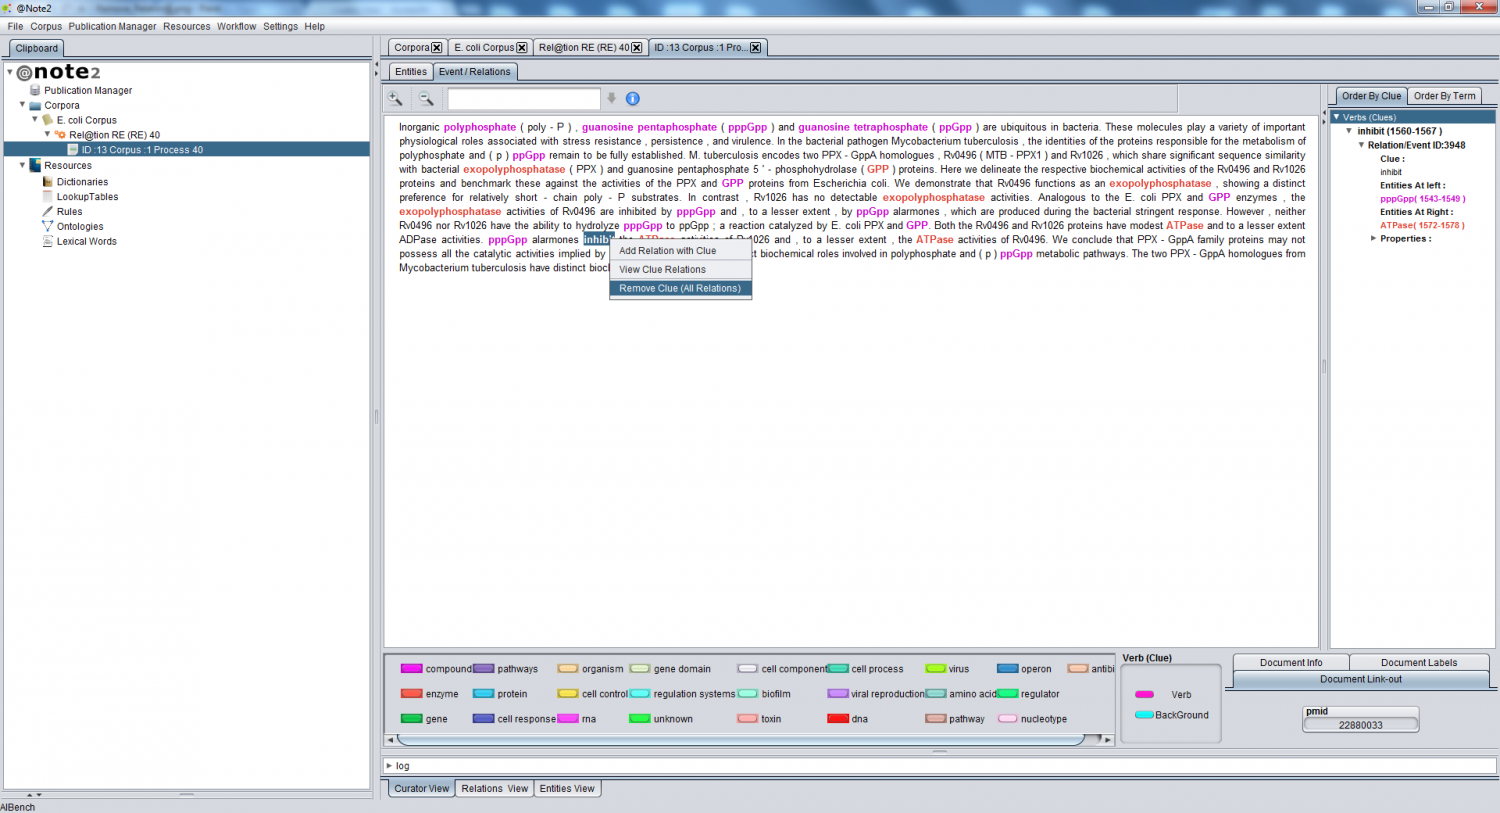
- By selecting a clue in text, right click and select remove All relation with Clue
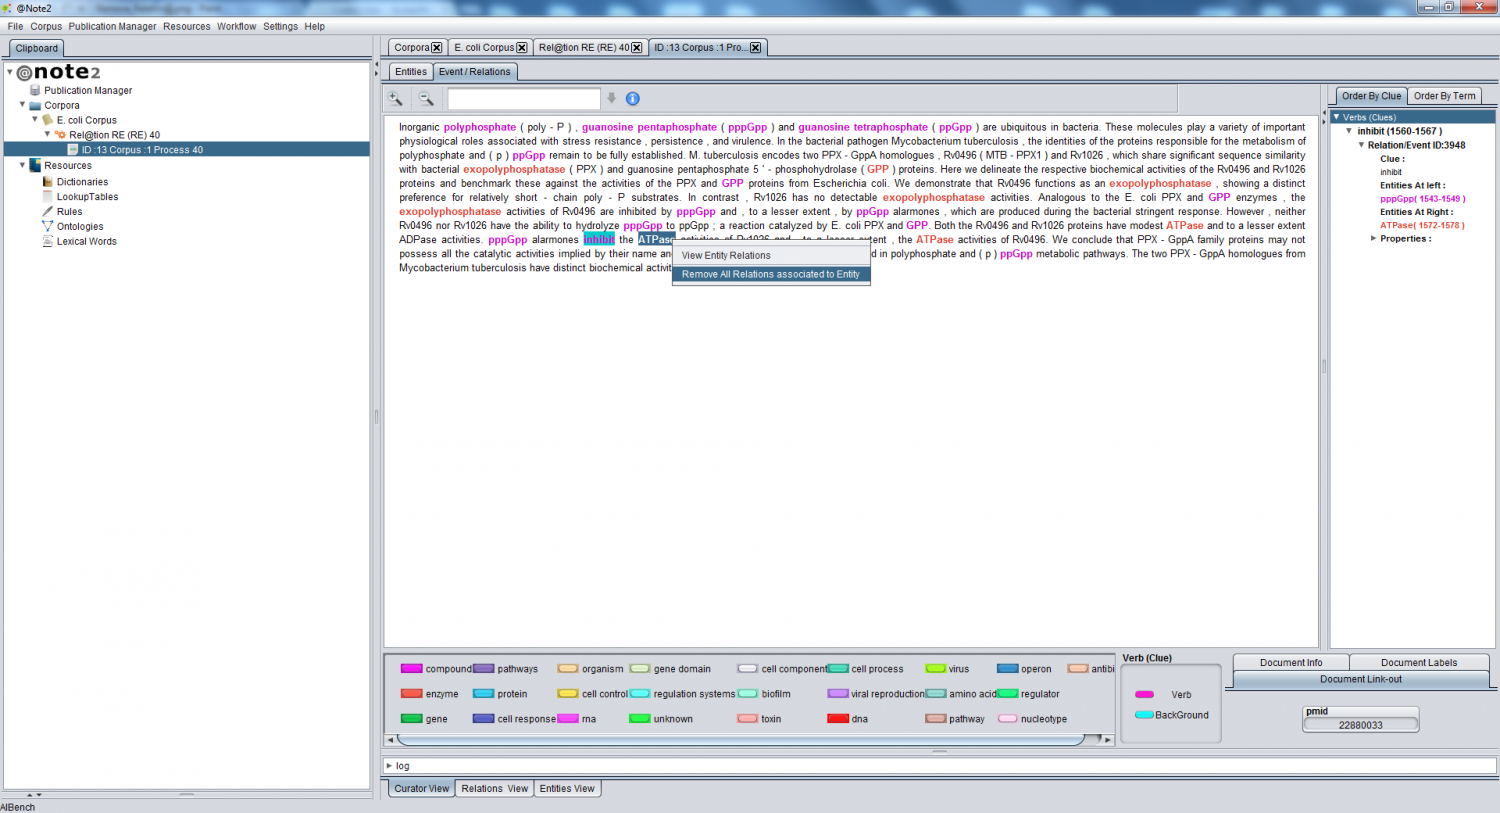
- By selecting a entity in text, right click and select remove All relation with Entity
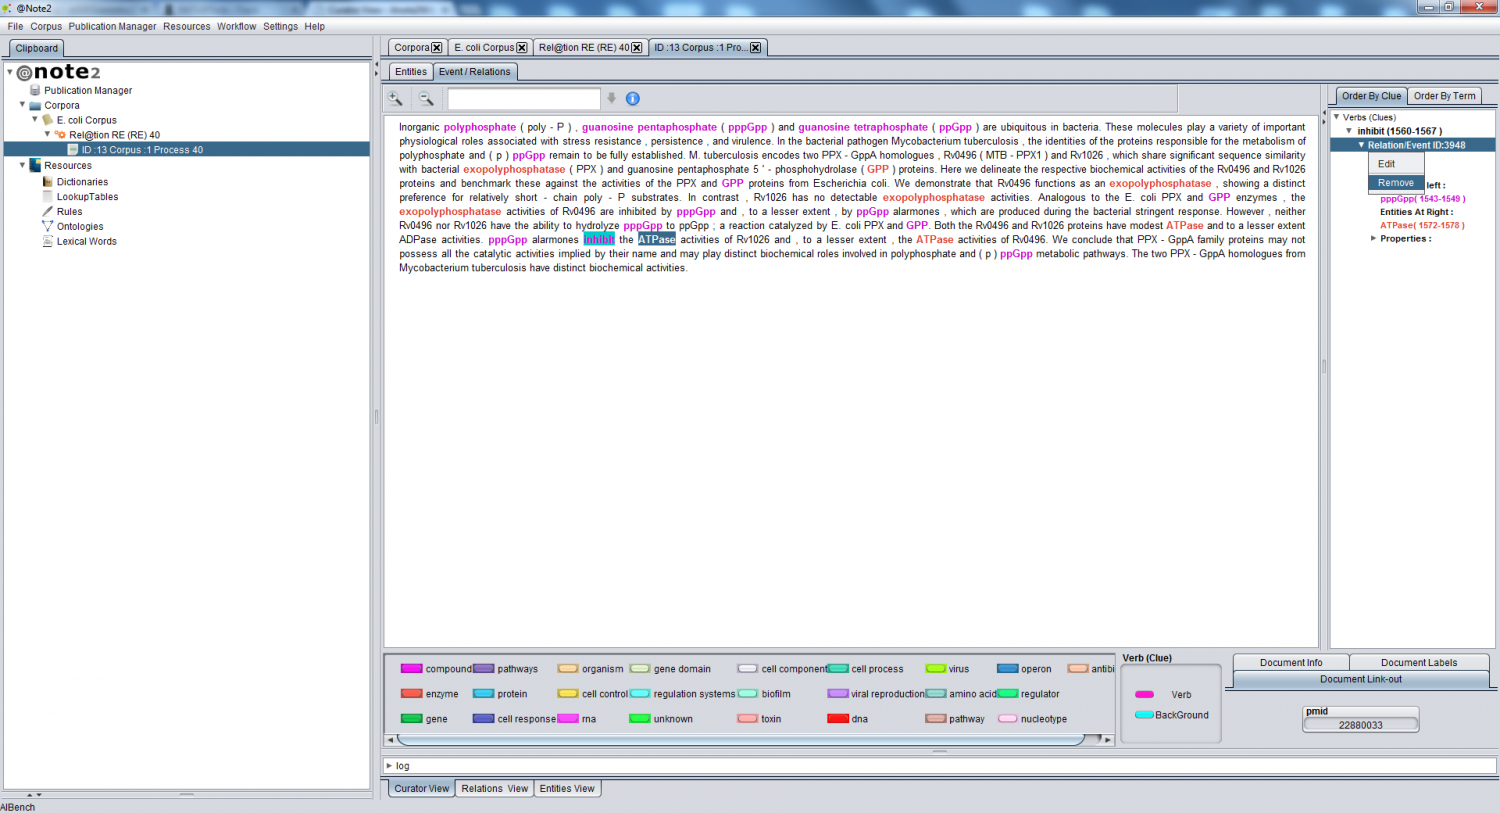
- By right click in Relation nodes in Order By Clue Tab in right panel and select remove option.
- By right click in Relation nodes in Order By Entity Tab in right panel and select remove option.
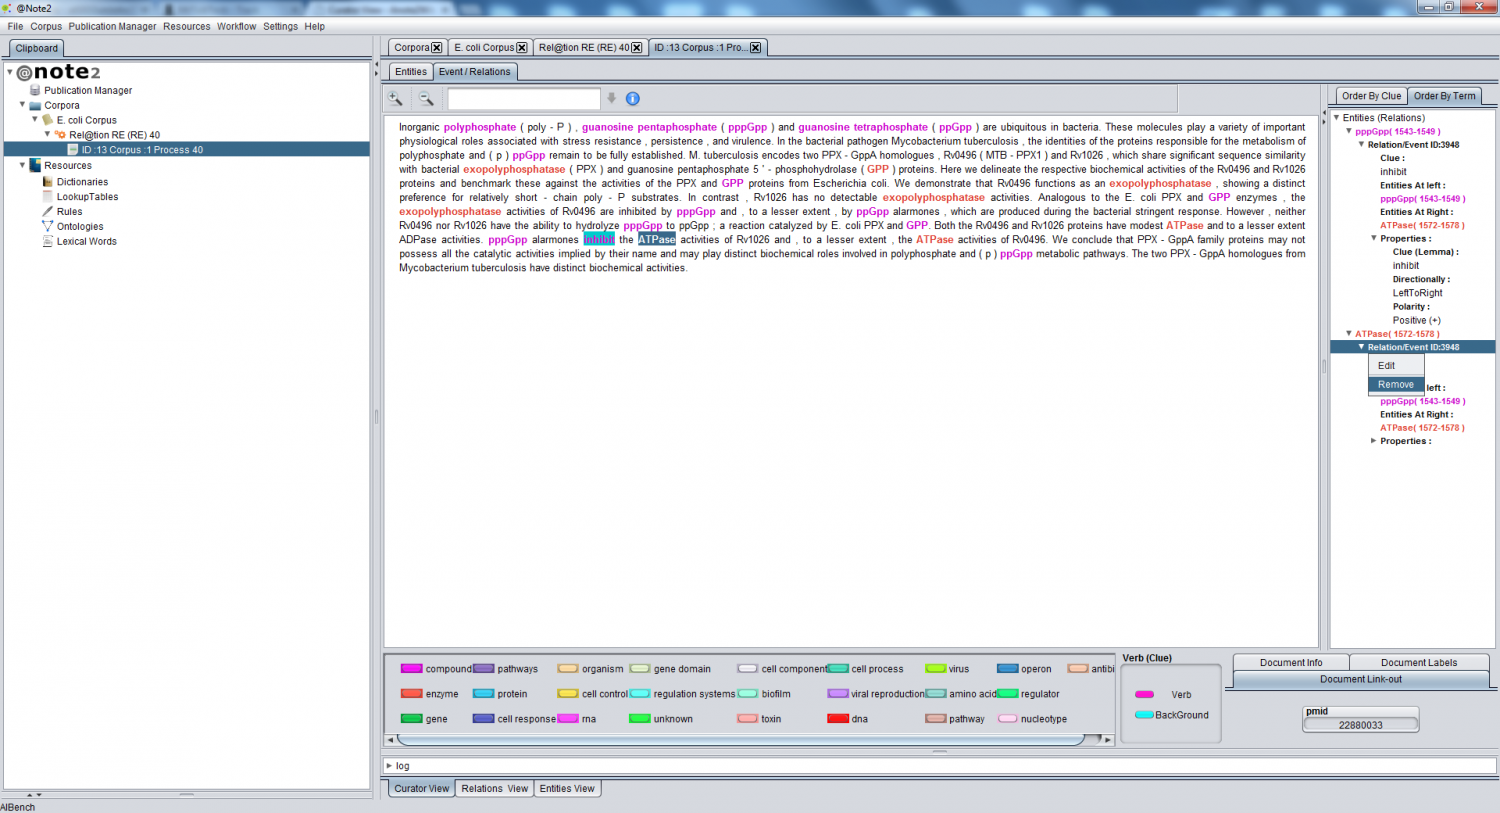
- In Multi Relation View user can remove relation in selected range.
