Difference between revisions of "Create Corpus By PDF Directory"
(→Update Publication Meta Information and Full Text) |
(→Update Document PMID (OtherID)) |
||
| (16 intermediate revisions by 2 users not shown) | |||
| Line 4: | Line 4: | ||
== Operation == | == Operation == | ||
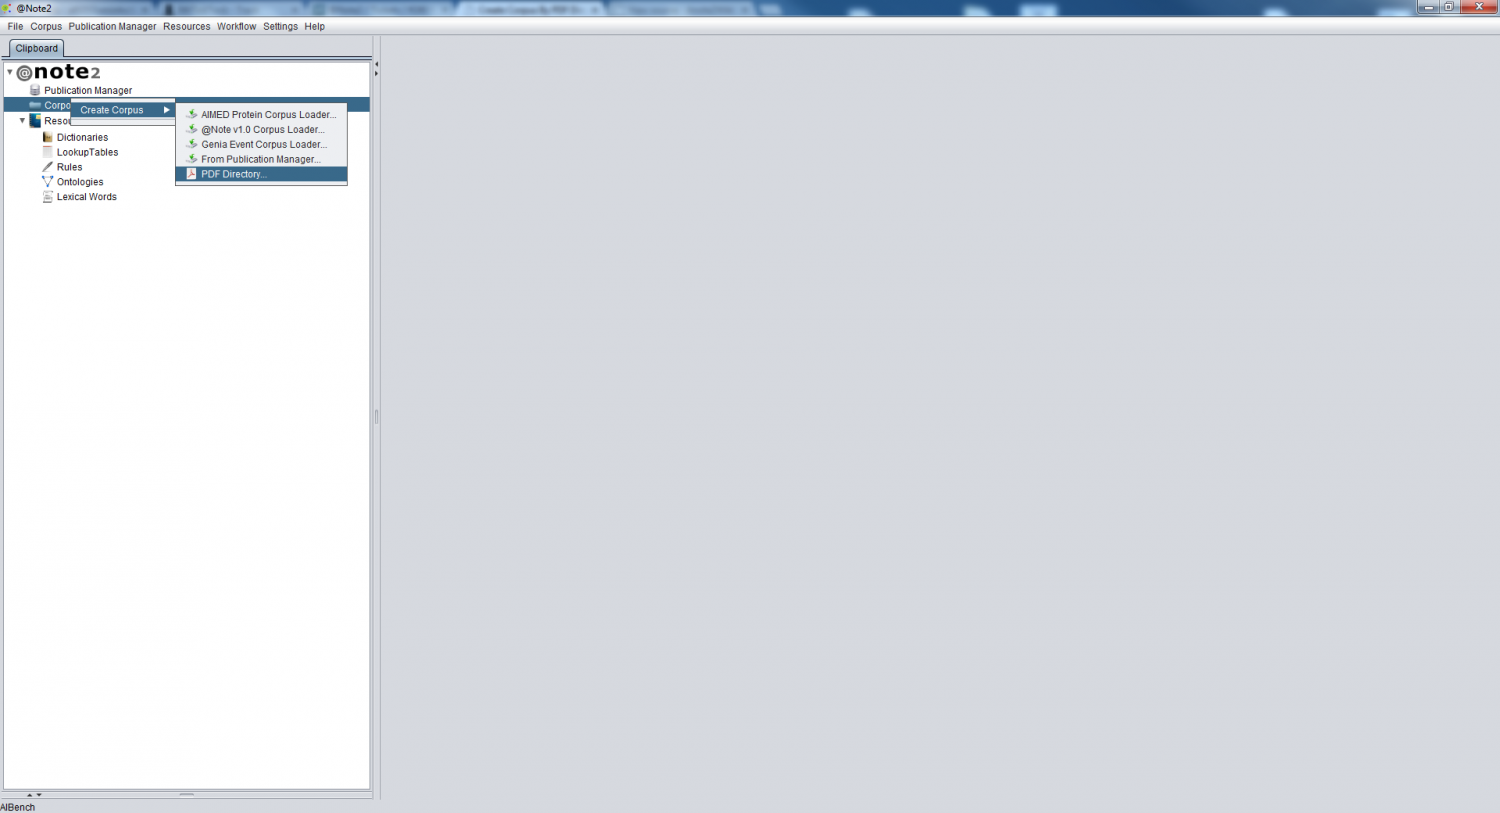
| − | To create a Corpus based on PDF | + | To create a Corpus based on a folder containing PDF files, click the Corpora datatype object in the clipboard and select the option '''Corpus -> Create -> PDF Directory'''. |
| Line 10: | Line 10: | ||
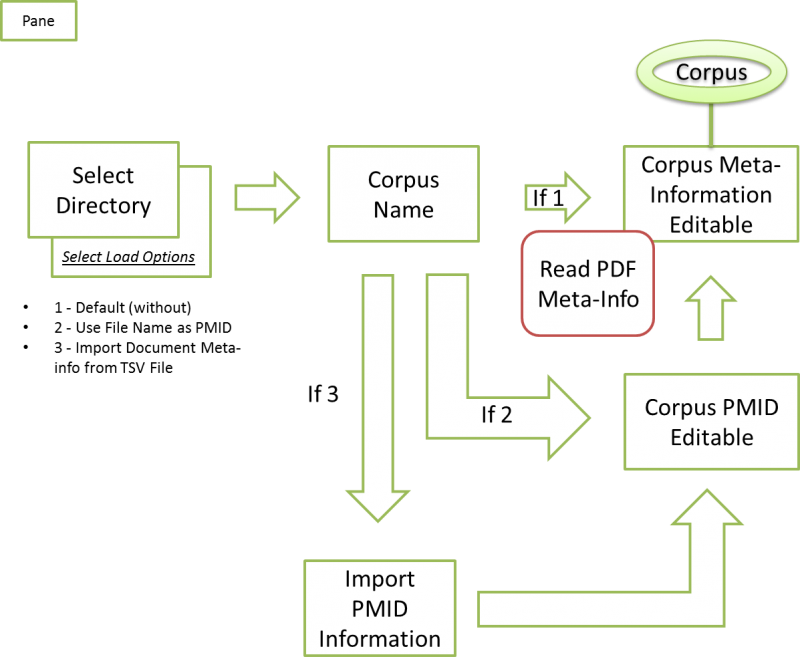
| − | Selecting this option causes the Corpus Creation wizard to be launched. Below a brief overview of | + | Selecting this option causes the Corpus Creation wizard to be launched. Below, we provide a brief overview of the steps. |
| + | |||
[[File:Create_Corpus_By_PDF_Directrory_Overview.png|800px|center]] | [[File:Create_Corpus_By_PDF_Directrory_Overview.png|800px|center]] | ||
| + | |||
== Select Loader Options and Directory == | == Select Loader Options and Directory == | ||
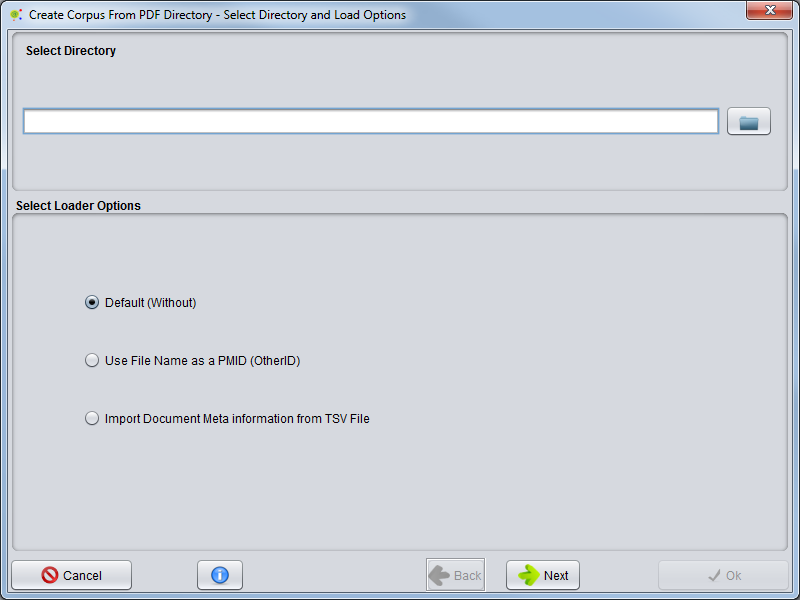
| − | A GUI appears allowing to select the folder where the PDF files are | + | A GUI appears allowing to select the folder where the PDF files are kept. |
| + | |||
| + | Here, you can opt for one of the following Loader Options: | ||
| − | + | * '''''Default (Without)''''' The PDF Meta-information will be searching using best effort techniques combining with PubMed Search for Digital Object Identifier (DOI) (Workflow Diagram Step 1) | |
| − | * ''''' | + | * '''''Use File Name as PMID (Other ID)''''' For each PDF file, the name is associated to a PMID; in further steps, @Note will find meta information (abstract, title or authors) for the article in Pubmed using this PMID (Workflow Diagram Step 2) |
| − | * ''''' | + | * '''''Import Document Meta information from TSV File''''' A tab-separated file (TSV) will be provided including columns with file name and PMID. In further steps, @Note will find meta information in PubMed using the defined PMIDs for each file (Workflow Diagram Step 3) |
| − | |||
[[File:Create_Corpus_By_PDF_Directrory_Step1.png|800px|center]] | [[File:Create_Corpus_By_PDF_Directrory_Step1.png|800px|center]] | ||
| Line 31: | Line 34: | ||
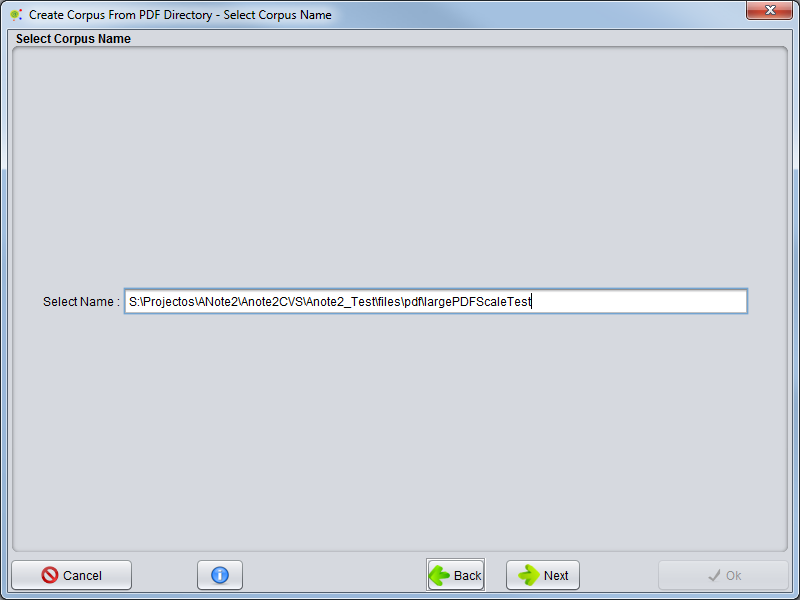
Select a name for the corpus, e.g “New Corpus” and press '''next'''. | Select a name for the corpus, e.g “New Corpus” and press '''next'''. | ||
| − | By | + | By default, the Corpus name is the directory full path. |
| + | |||
[[File:Create_Corpus_By_PDF_Directrory_Step2.png|800px|center]] | [[File:Create_Corpus_By_PDF_Directrory_Step2.png|800px|center]] | ||
| Line 37: | Line 41: | ||
== Import Meta-Information == | == Import Meta-Information == | ||
| − | + | If the option to use a TSV file is chosen, a graphical interface is launched that allows you to select the file / view information about the first lines and select the General Delimiter, Text Delimiter, DefaultValue and mapping between File name or full path and PMID. | |
[[File:Create_Corpus_By_PDF_Directrory_Step2b.png|800px|center]] | [[File:Create_Corpus_By_PDF_Directrory_Step2b.png|800px|center]] | ||
| + | |||
* General Delimiter: overall file delimiter to split the contents of different columns (in Blue) | * General Delimiter: overall file delimiter to split the contents of different columns (in Blue) | ||
| Line 49: | Line 54: | ||
== Update Document PMID (OtherID) == | == Update Document PMID (OtherID) == | ||
| − | A graphical interface is launched that allows you to edit the file PMID information. Pressing PDF button a | + | A graphical interface is launched that allows you to edit the file PMID information. Pressing the PDF button allow the PDF file to be opened. If user not define a PMID for one document System try finding meta-information using best effort techniques combining with PubMed searching using DOI retrieved. |
| + | |||
[[File:Create_Corpus_By_PDF_Directrory_Step3.png|800px|center]] | [[File:Create_Corpus_By_PDF_Directrory_Step3.png|800px|center]] | ||
| Line 55: | Line 61: | ||
== Update Publication Meta Information and Full Text == | == Update Publication Meta Information and Full Text == | ||
| − | In this last GUI it | + | In this last GUI it is possible to change all meta-information about the articles loaded. It is also possible to edit the PDF to Text conversion. In left side, you can inspect the list of documents indexed by document title (if available) or file name. These can be highlighted with two colors: green means that document meta-information is complete (title, abstract and authors are filled); otherwise, the documents is marked in red. |
| − | + | Selecting one document from the list, you can edit the meta-information for this document and switching to "Full Text" tab you can also update the PDF to Text conversion (in most cases this has errors). | |
| + | |||
| + | After finished, you should press the '''Ok''' button and a new Corpus will be created. | ||
| − | |||
[[File:Create_Corpus_By_PDF_Directrory_Step4.png|800px|center]] | [[File:Create_Corpus_By_PDF_Directrory_Step4.png|800px|center]] | ||
| Line 65: | Line 72: | ||
== Result == | == Result == | ||
| − | A new Corpus is now created and will be available in the clipboard, being visualized through the [[Corpora Load Corpus|Corpora View]]. | + | A new Corpus is now created and will be available in the clipboard, being visualized through the [[Corpora Load Corpus|Corpora View]] and automatically opened in the clipboard. |
| + | |||
| + | |||
| + | [[File:Create_Corpus_By_PDF_Directrory_Result.png|1500px|center]] | ||
| + | |||
| + | |||
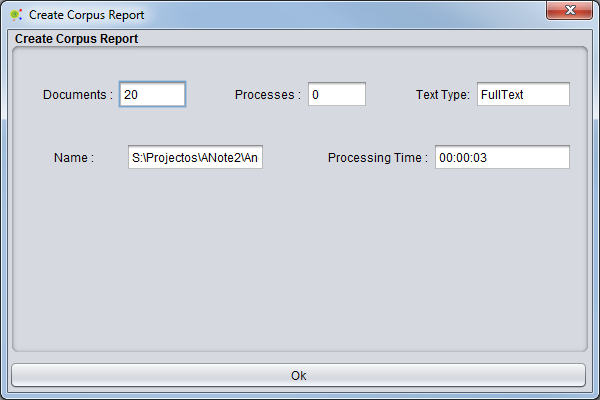
| + | Besides, a Corpus Create report will be launched | ||
| + | |||
| + | |||
| + | [[File:Create_Corpus_By_PDF_Directrory_Result_2.png|600px|center]] | ||
Latest revision as of 14:16, 17 July 2014
Contents
Operation
To create a Corpus based on a folder containing PDF files, click the Corpora datatype object in the clipboard and select the option Corpus -> Create -> PDF Directory.
Selecting this option causes the Corpus Creation wizard to be launched. Below, we provide a brief overview of the steps.
Select Loader Options and Directory
A GUI appears allowing to select the folder where the PDF files are kept.
Here, you can opt for one of the following Loader Options:
- Default (Without) The PDF Meta-information will be searching using best effort techniques combining with PubMed Search for Digital Object Identifier (DOI) (Workflow Diagram Step 1)
- Use File Name as PMID (Other ID) For each PDF file, the name is associated to a PMID; in further steps, @Note will find meta information (abstract, title or authors) for the article in Pubmed using this PMID (Workflow Diagram Step 2)
- Import Document Meta information from TSV File A tab-separated file (TSV) will be provided including columns with file name and PMID. In further steps, @Note will find meta information in PubMed using the defined PMIDs for each file (Workflow Diagram Step 3)
Select Corpus Name
Select a name for the corpus, e.g “New Corpus” and press next. By default, the Corpus name is the directory full path.
Import Meta-Information
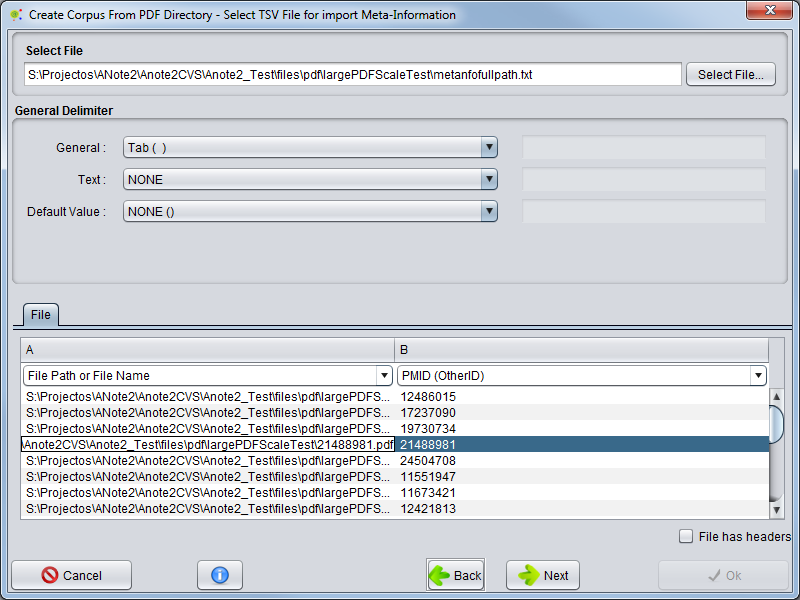
If the option to use a TSV file is chosen, a graphical interface is launched that allows you to select the file / view information about the first lines and select the General Delimiter, Text Delimiter, DefaultValue and mapping between File name or full path and PMID.
- General Delimiter: overall file delimiter to split the contents of different columns (in Blue)
- Text Delimiter: delimiter to encapsulate information
- Default Value: default value used to represent empty records ( in orange )
- Column Selection Options: select the column in the file for file Name or file full path and column for PMID
Update Document PMID (OtherID)
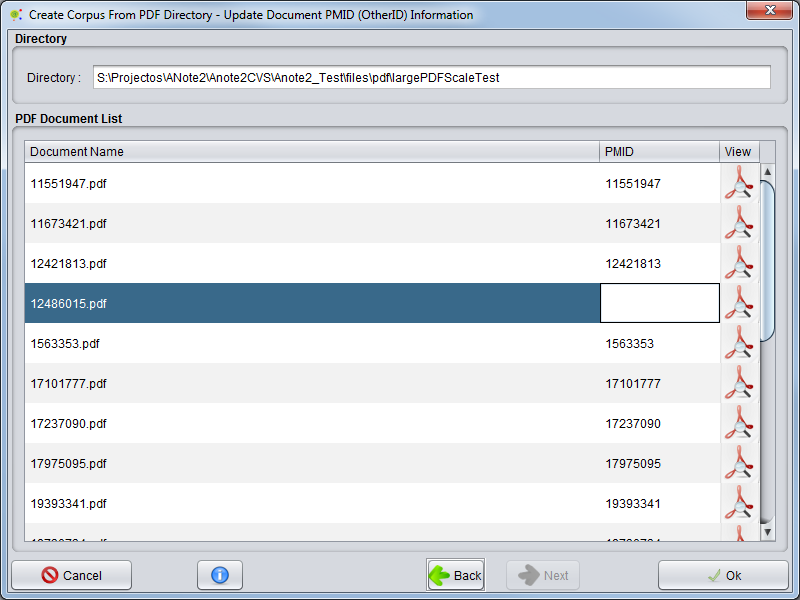
A graphical interface is launched that allows you to edit the file PMID information. Pressing the PDF button allow the PDF file to be opened. If user not define a PMID for one document System try finding meta-information using best effort techniques combining with PubMed searching using DOI retrieved.
Update Publication Meta Information and Full Text
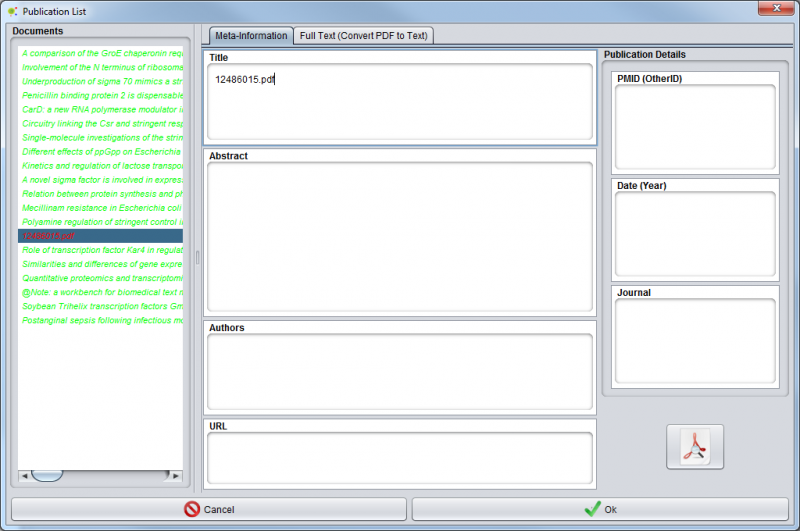
In this last GUI it is possible to change all meta-information about the articles loaded. It is also possible to edit the PDF to Text conversion. In left side, you can inspect the list of documents indexed by document title (if available) or file name. These can be highlighted with two colors: green means that document meta-information is complete (title, abstract and authors are filled); otherwise, the documents is marked in red.
Selecting one document from the list, you can edit the meta-information for this document and switching to "Full Text" tab you can also update the PDF to Text conversion (in most cases this has errors).
After finished, you should press the Ok button and a new Corpus will be created.
Result
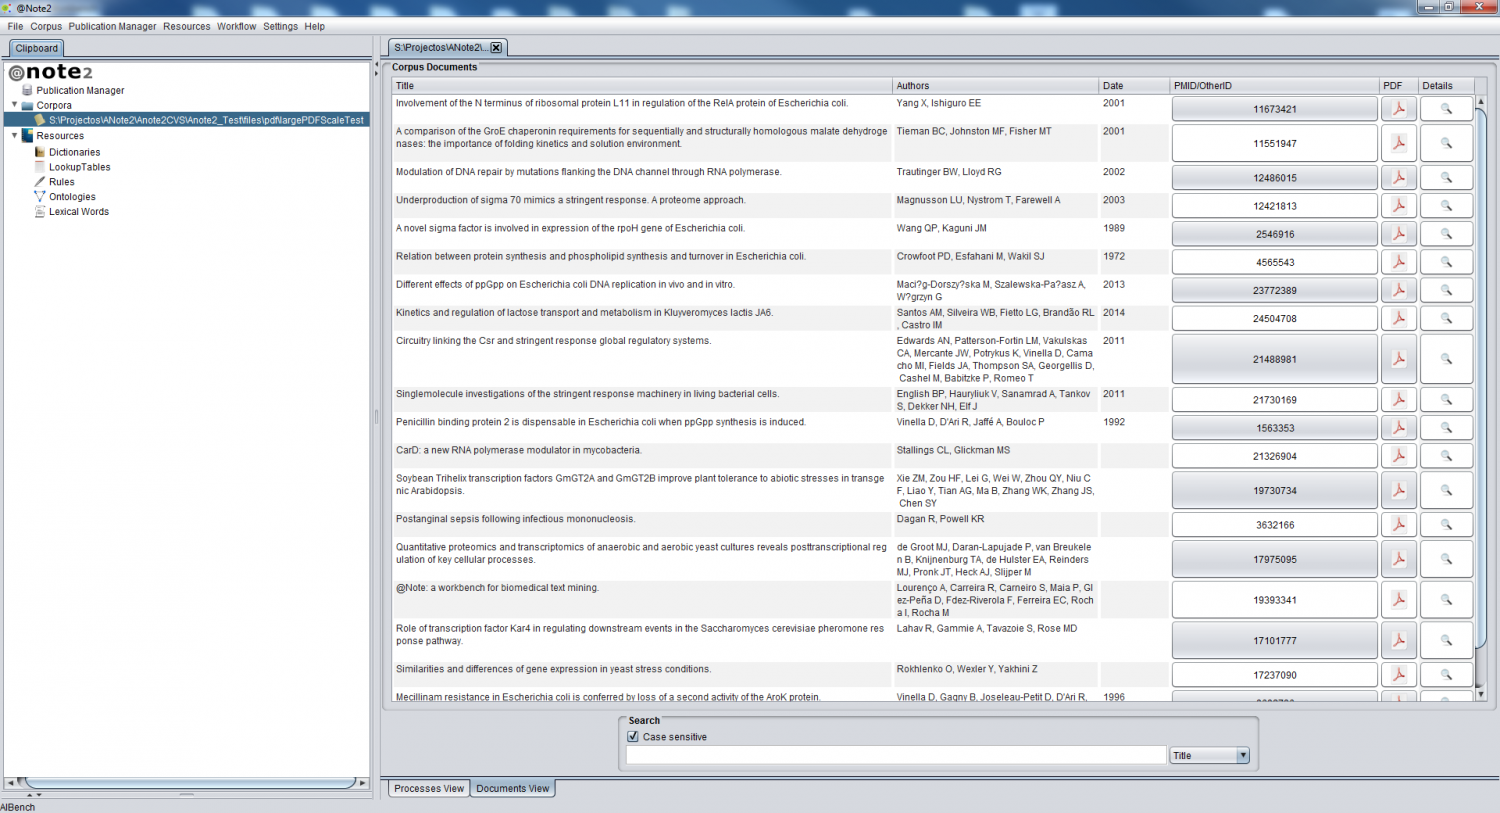
A new Corpus is now created and will be available in the clipboard, being visualized through the Corpora View and automatically opened in the clipboard.
Besides, a Corpus Create report will be launched
