Difference between revisions of "Corpus Relation Extraction"
Anote2Wiki (talk | contribs) (→Manual Curation (from Other Process)) |
|||
| (22 intermediate revisions by 3 users not shown) | |||
| Line 1: | Line 1: | ||
| + | __TOC__ | ||
[[Category:HOWTOs]] | [[Category:HOWTOs]] | ||
| + | == Operation == | ||
| + | To perform a '''Relation Extraction''' (RE) process based in Natutal Language Processing algorithms, you should right click a Corpus data-type object and select the option '''Corpus -> RE-> Relation Extraction'''. | ||
| + | If the Corpus is not in the clipboard, you should begin by [[Corpora_Load_Corpus|loading the Corpus to the Clipboard]]. | ||
| − | |||
| − | + | [[Image:Corpus_Process_RE.png|1500px|center]] | |
| + | |||
| + | |||
| + | A new wizard is presented that allows to configure the RE process. | ||
| − | + | == Entity Process Selection == | |
| + | The first panel enables the '''selection''' of the '''processes''' that contain the entities annotated, allowing to view some statistics and process properties. After selecting the process press '''Next''' to continue. | ||
| − | |||
| − | |||
[[Image:RE1.png|800px|center]] | [[Image:RE1.png|800px|center]] | ||
| − | + | == POS-Tagger selection == | |
| + | The next panel allows for '''POS-Tagger selection'''. Here, you select which POS-Tagger will be used, and some information about its origin and properties will be presented. After choosing the desired POS-Tagger press '''Next''' to continue. | ||
| + | |||
[[Image:RE2.png|800px|center]] | [[Image:RE2.png|800px|center]] | ||
| − | + | == Relation Extraction Model Selection == | |
| + | The following panel allows for '''Relation Extraction Model Selection'''. Select the most adequate model (the panel below shows the expected type of results). After selecting the best model press '''Next'''. | ||
| + | |||
[[Image:RE3.png|800px|center]] | [[Image:RE3.png|800px|center]] | ||
| − | + | == Advanced Options == | |
| + | The following panel allows for ''Relation Extraction Advanced Options'''. Here, you can filter relations by relation types or advanced model options. | ||
| + | |||
| + | === Relation Types === | ||
| + | |||
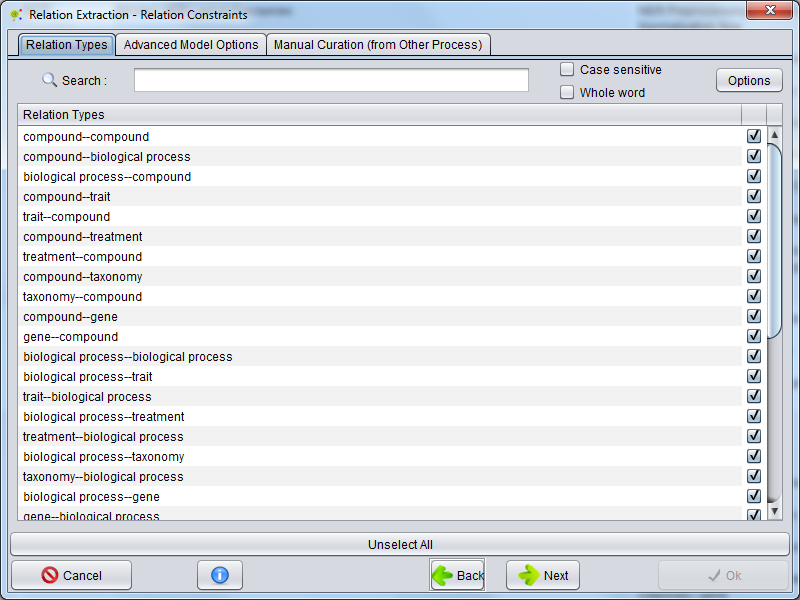
| + | You can select the relations types that will be extracted: | ||
| + | |||
| + | |||
| + | [[Image:RE3_2.png|800px|center]] | ||
| + | |||
| + | |||
| + | === Advanced Model Options === | ||
| + | |||
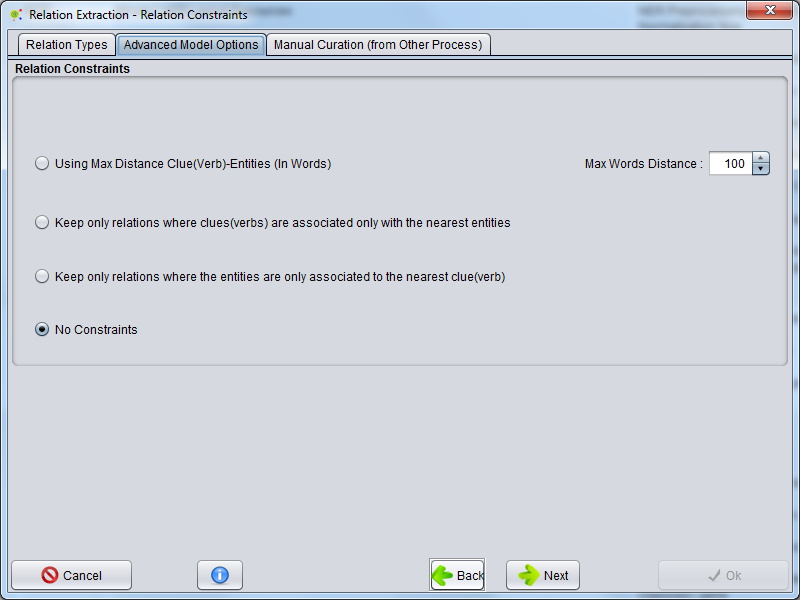
| + | You can also select one of the advanced relation model options: | ||
| + | * Using a maximum word distance between verbs (clues) and annotated entities in the sentence; | ||
| + | * Keep Only Relations where verbs are associated only with nearest entities | ||
| + | * Keep Only relations where the entities are only associated to the nearest verb | ||
| + | * Without constrains | ||
| + | |||
| + | |||
| + | [[Image:RE3_3.png|800px|center]] | ||
| + | |||
| + | === Manual Curation (from Other Process) === | ||
| + | |||
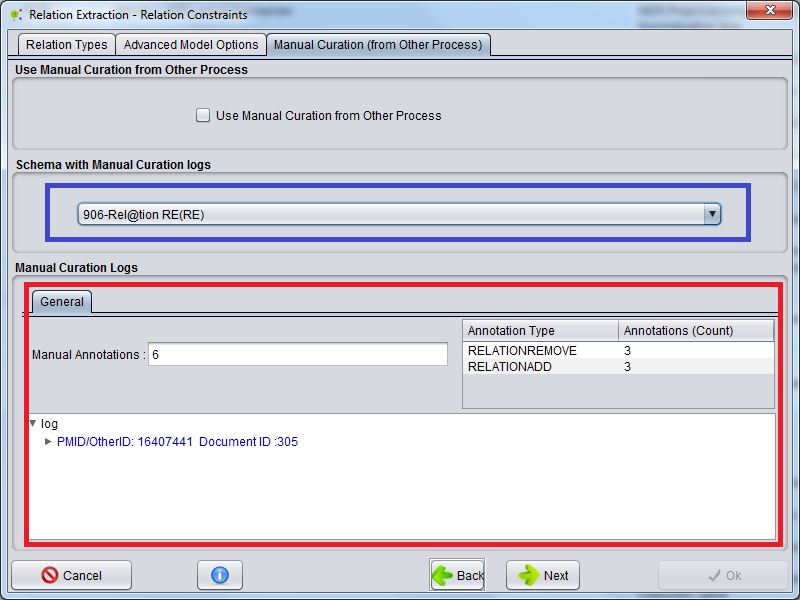
| + | You can activate the possibility to merge manually curated entities and relations from another previous process in the RE Process. | ||
| + | |||
| + | The manual process selection is made in the combo box denoted in the section highlighted in blue. | ||
| + | |||
| + | The manual curation details (ordered by document) are also present in the section highlighted in red. | ||
| + | |||
| + | |||
| + | [[File:RE3_4.png|800px|center]] | ||
| + | |||
| + | |||
| + | Notes : Annotation Types Meaning | ||
| + | |||
| + | ENTITYUPDATE: Entities whose class was changed (Violet) | ||
| + | |||
| + | ENTITYREMOVE: Entities that were removed (Red) | ||
| + | |||
| + | ENTITYADD: Entities that were added (green) | ||
| + | |||
| + | RELATIONUPDATE: Relation whose annotated entities was changed (Violet) | ||
| + | |||
| + | RELATIONREMOVE: Relation that was removed (Red) | ||
| + | |||
| + | RELATIONADD: Relation that was added (green) | ||
| + | |||
| + | == Verb List Filter == | ||
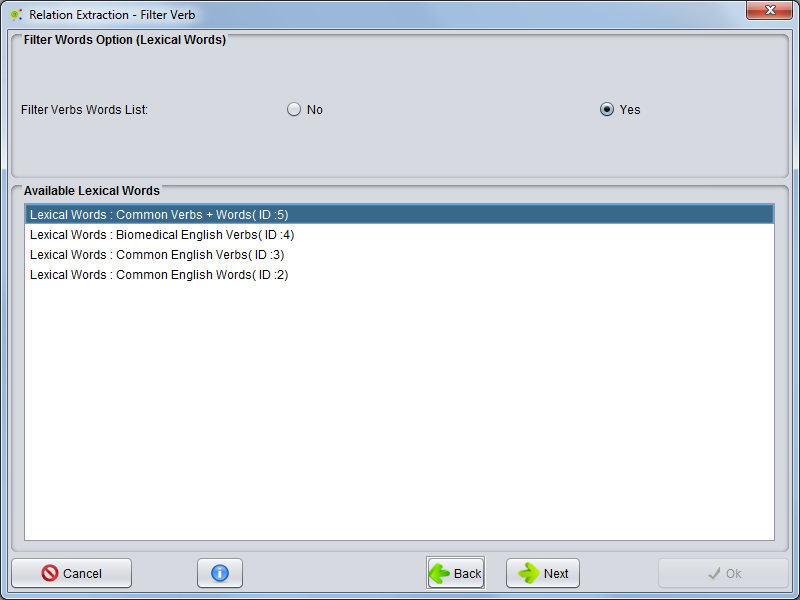
| + | The next panel allows choosing if a '''Verb List''' will be used to filter the results and define this list. You can select a list of verbs (a Lexical Words object) that will not be used to create relations Typically, this will be used to avoid relations with common English verbs (e.g. be, do). | ||
| + | |||
[[Image:RE4.png|800px|center]] | [[Image:RE4.png|800px|center]] | ||
| − | + | == Verb List Added == | |
| + | The next panel allows choosing an additional '''Verb List'''. You can select a list of verbs (a Lexical Words object) to add as relation clues, i.e. they provide a complement to the verbs list used internally by @Note. | ||
| + | Once this option is selected, press '''Ok'''. | ||
| + | |||
[[Image:RE5.png|800px|center]] | [[Image:RE5.png|800px|center]] | ||
| − | RE operation will start and a | + | == Result == |
| + | The RE operation will start and a progress window is shown, indicating the execution of the operation. The RE operation will take a few minutes or hours, depending on corpus size. | ||
| − | When the process | + | When the process ends, a new '''RE Process''' object will be added to the [[Corpus_Load_Process|''Corpus Process View'']]. |
Latest revision as of 17:22, 16 January 2015
Contents
Operation
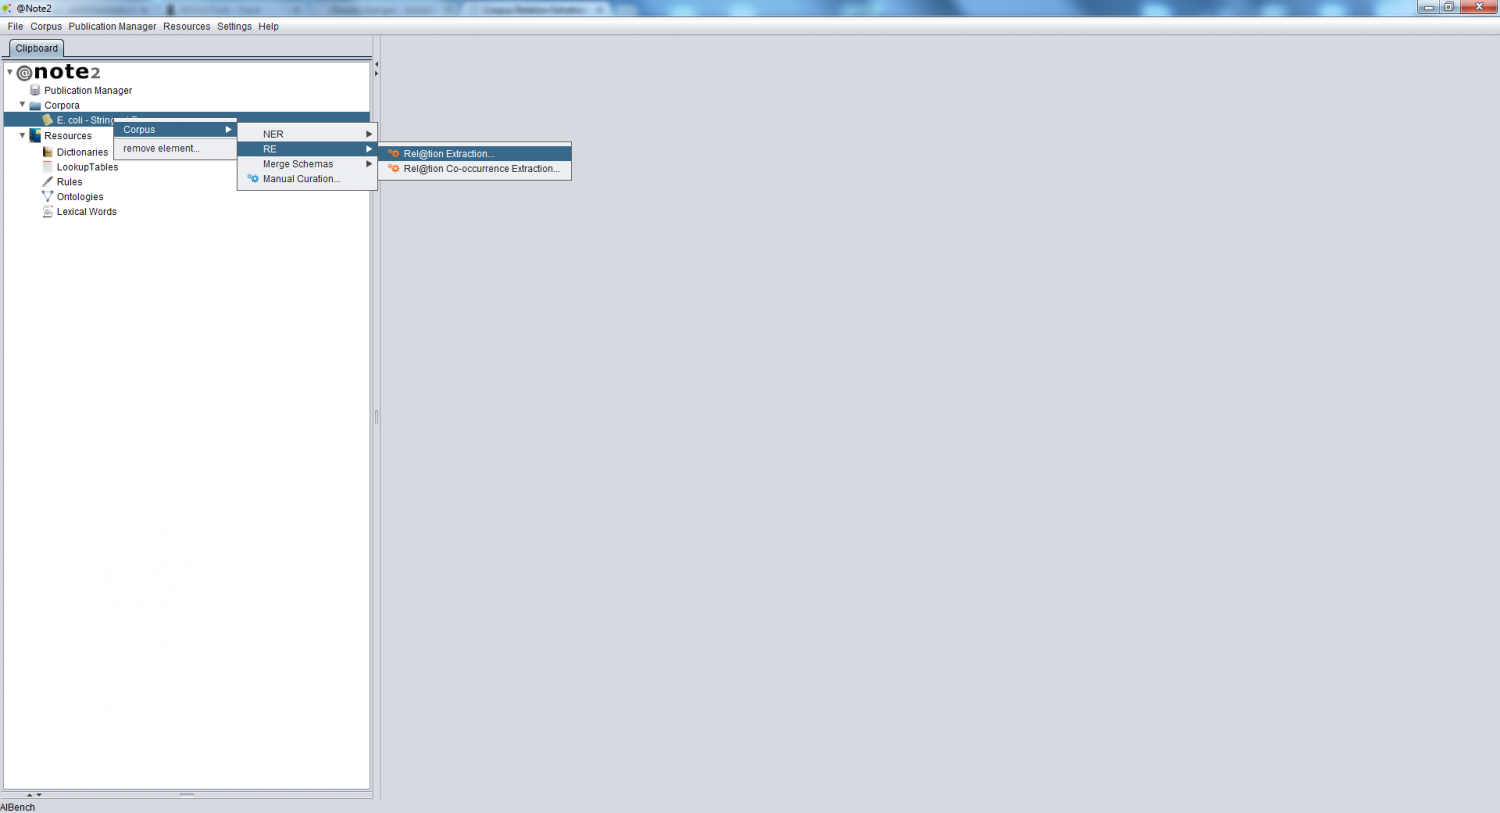
To perform a Relation Extraction (RE) process based in Natutal Language Processing algorithms, you should right click a Corpus data-type object and select the option Corpus -> RE-> Relation Extraction. If the Corpus is not in the clipboard, you should begin by loading the Corpus to the Clipboard.
A new wizard is presented that allows to configure the RE process.
Entity Process Selection
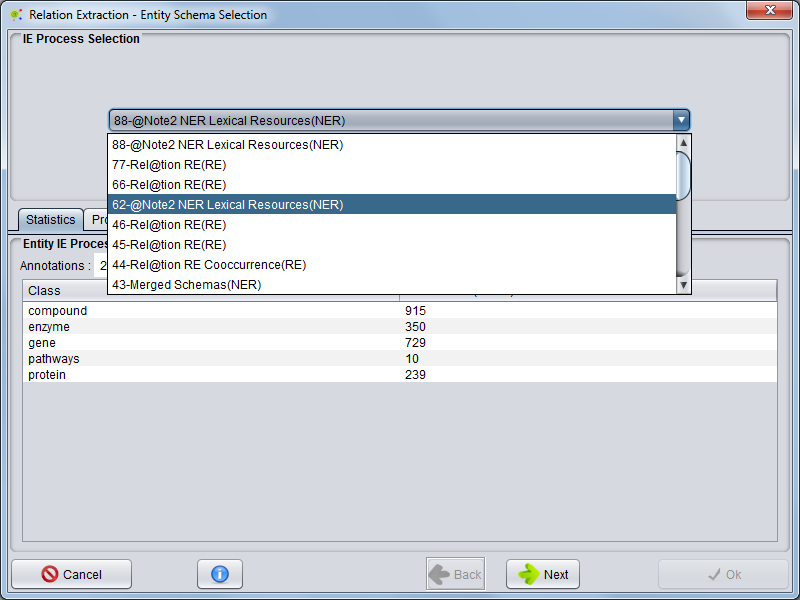
The first panel enables the selection of the processes that contain the entities annotated, allowing to view some statistics and process properties. After selecting the process press Next to continue.
POS-Tagger selection
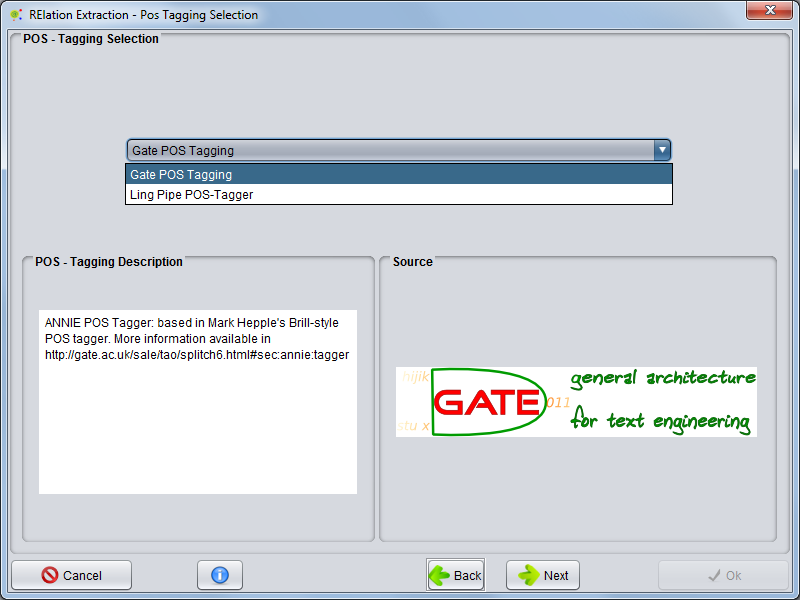
The next panel allows for POS-Tagger selection. Here, you select which POS-Tagger will be used, and some information about its origin and properties will be presented. After choosing the desired POS-Tagger press Next to continue.
Relation Extraction Model Selection
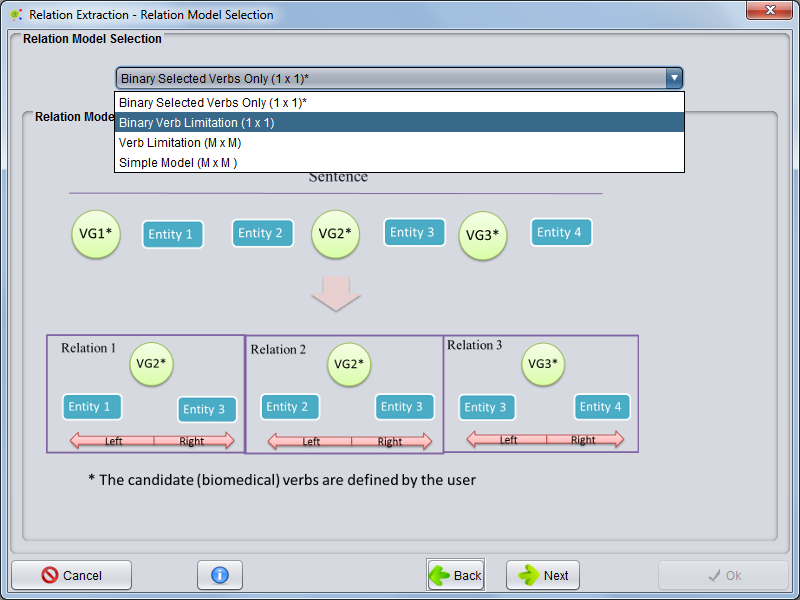
The following panel allows for Relation Extraction Model Selection. Select the most adequate model (the panel below shows the expected type of results). After selecting the best model press Next.
Advanced Options
The following panel allows for Relation Extraction Advanced Options'. Here, you can filter relations by relation types or advanced model options.
Relation Types
You can select the relations types that will be extracted:
Advanced Model Options
You can also select one of the advanced relation model options:
- Using a maximum word distance between verbs (clues) and annotated entities in the sentence;
- Keep Only Relations where verbs are associated only with nearest entities
- Keep Only relations where the entities are only associated to the nearest verb
- Without constrains
Manual Curation (from Other Process)
You can activate the possibility to merge manually curated entities and relations from another previous process in the RE Process.
The manual process selection is made in the combo box denoted in the section highlighted in blue.
The manual curation details (ordered by document) are also present in the section highlighted in red.
Notes : Annotation Types Meaning
ENTITYUPDATE: Entities whose class was changed (Violet)
ENTITYREMOVE: Entities that were removed (Red)
ENTITYADD: Entities that were added (green)
RELATIONUPDATE: Relation whose annotated entities was changed (Violet)
RELATIONREMOVE: Relation that was removed (Red)
RELATIONADD: Relation that was added (green)
Verb List Filter
The next panel allows choosing if a Verb List will be used to filter the results and define this list. You can select a list of verbs (a Lexical Words object) that will not be used to create relations Typically, this will be used to avoid relations with common English verbs (e.g. be, do).
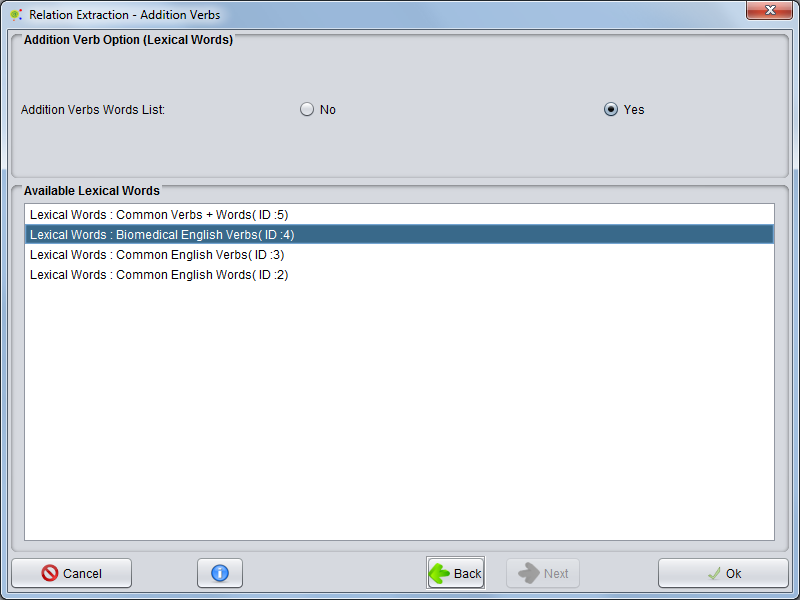
Verb List Added
The next panel allows choosing an additional Verb List. You can select a list of verbs (a Lexical Words object) to add as relation clues, i.e. they provide a complement to the verbs list used internally by @Note. Once this option is selected, press Ok.
Result
The RE operation will start and a progress window is shown, indicating the execution of the operation. The RE operation will take a few minutes or hours, depending on corpus size.
When the process ends, a new RE Process object will be added to the Corpus Process View.
